Osetin Themes | 2015
User Manual
Wordpress Theme "Moon"
Extensive documentation guide version 1.0.0
Welcome
Thank you for the purchase of our premium theme Moon. We will walk you through the installation and setup of this theme. Hold tight, it will be quick and easy.
Topics:
- Installing the theme
- Importing Demo Data XML
- Theme Requirements
- Setting up a homepage
- Creating Posts
- Post Formats
- Creating Navigation Menu
- Selecting Navigation Menu Styles
- Customer Testimonials
- Pricing Plans
- Contact Page
- Category Tiles
- Service Booking & Reservations
- Customizing Layouts for Tiles
- Modifying Media Location
- Selecting Pagination Type
- Picture & Posts Sliding Settings
- Setting up a WooCommerce Shop
- Theme Translation & Multilingual
- Locations & Maps
- Adding Links to Social Networks
- Customizing Theme Appearance
- Updating theme "Moon"
- For Developers
- Frequently Asked Questions
- Changelog & Updates History
Installing the theme
Video Guide
We've created a quick video guide to show you how easy it is to install "Moon". If video does not work for you or you need a different method of installation, try reading below for other methods of installation.
Step by Step guide
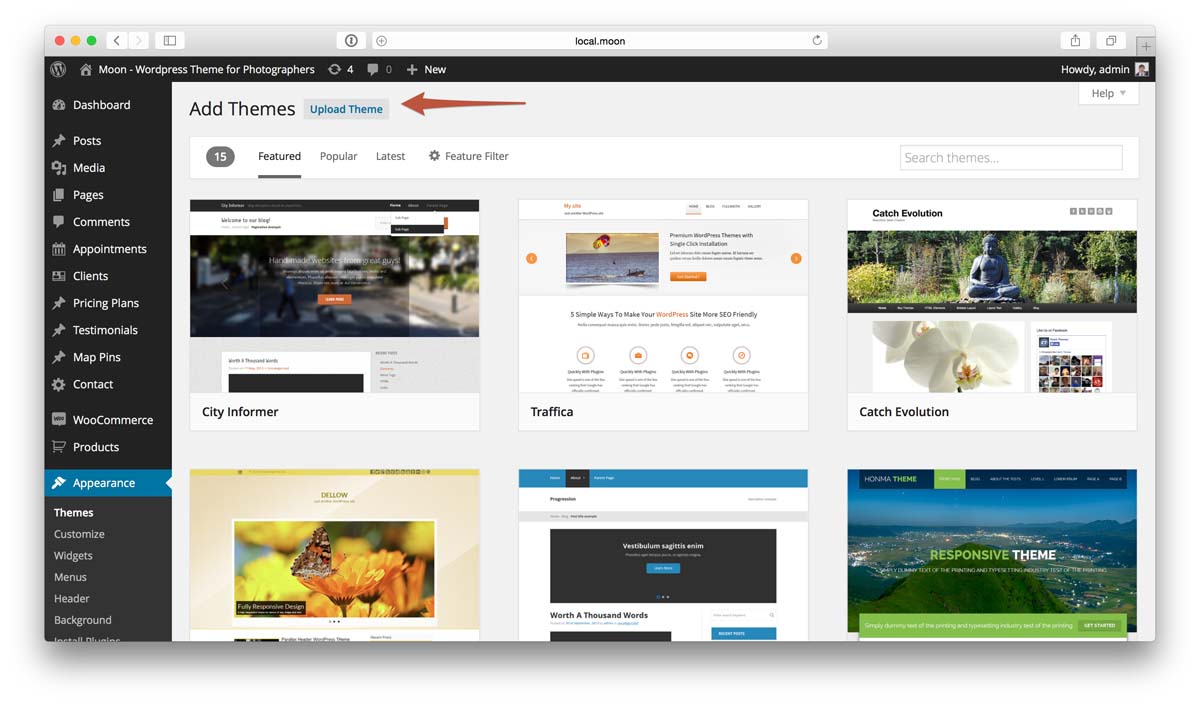
Method 1 (Recommended): Installing using Admin
You can install Moon to your website by using the Add New Themes option in the Appearance sub-menu.
- Log in to the WordPress Administration Panels.
-
Select the Appearance panel, then Themes.

- Select Add New.
-
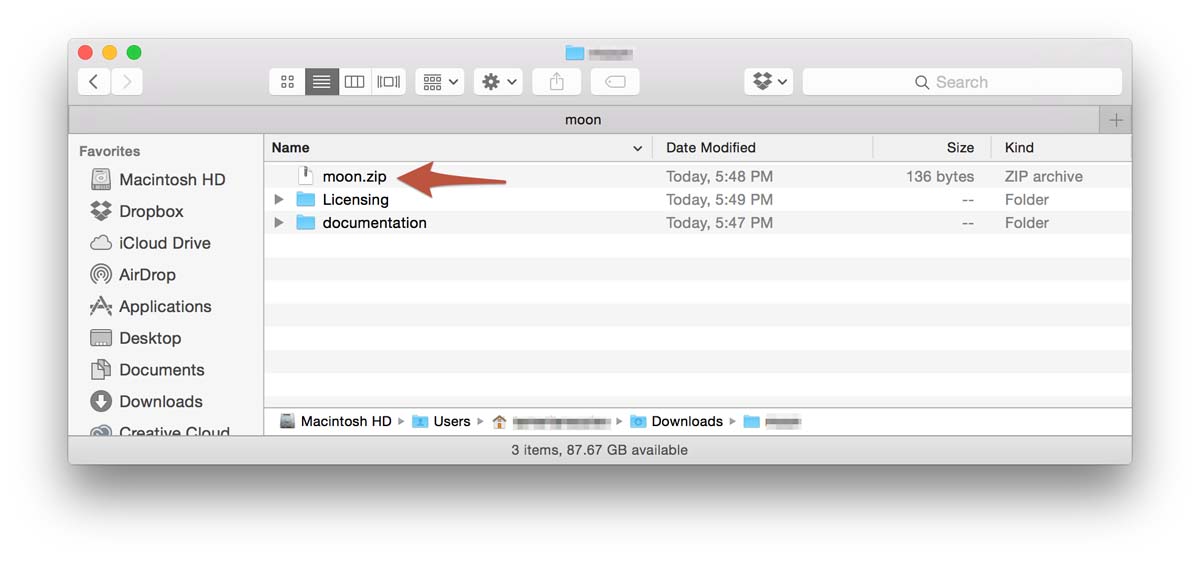
Use the Upload Theme link on top to upload a zipped copy of a Theme that you have previously downloaded to your machine. File to upload is called moon.zip, it should be located inside of the archive you downloaded from ThemeForest
-
When Wordpress finishes installing the theme and outputs a "Theme installed successfully" message, click Activate link.
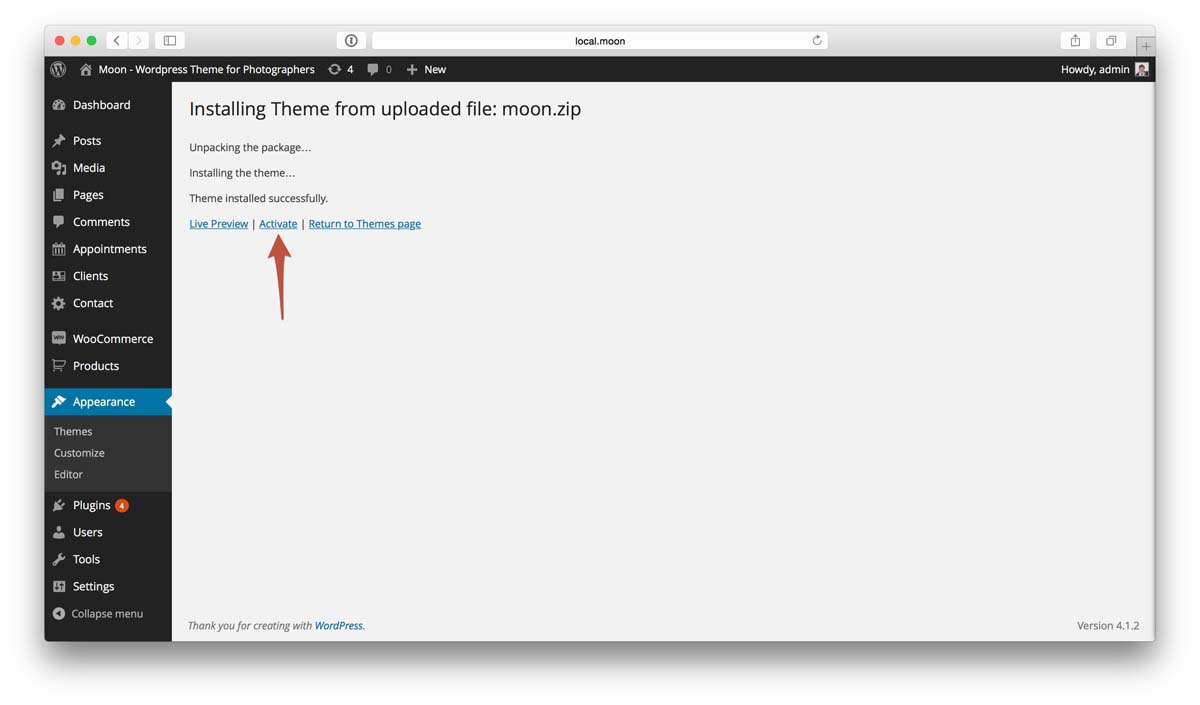
- That's it, now the theme is installed & activated.
Method 2: Installation by using cPanel
If your host offers the cPanel control panel, and the Theme files are in a .zip or .gz archive follow these instructions. Note: This assumes the Theme you download is a compressed (.zip) file containing a folder under which all the Theme files reside.
- Download the Theme .zip file to your local machine.
- In cPanel File Manager, navigate to your Themes folder. If your WordPress is installed in the document root folder of your web server you would navigate to "public_html/wp-content/themes" and if you have WordPress installed in a sub-folder called wordpress, you would navigate to "public_html/wordpress/wp-content/themes".
- Once you've navigated to the Themes folder in cPanel File Manager, click on Upload file(s) and upload that .zip file you saved in Step 1.
- Once the .zip file is uploaded, click on the name of that file in cPanel, then in the panel to the right, click on "Extract File Contents", and that .zip file will be uncompressed.
- Follow the instructions below for selecting the new Theme.
Method 3: Installing "Moon" Manually (FTP)
To add a new Theme to your WordPress installation, follow these basic steps:
- Download the Theme archive and extract the files it contains. You may need to preserve the directory structure in the archive when extracting these files. Follow the guidelines provided by your Theme author.
- Using an FTP client to access your host web server, create a directory to save your Theme in the wp-content/themes directory provided by WordPress. For example, a Theme named Test should be in wp-content/themes/test. Your Theme may provide this directory as part of the archive.
- Upload the Theme files to the new directory on your host server.
- Follow the instructions below for selecting the new Theme.
Importing Demo Data XML
This is an optional step. You can import a demo data to play around with and learn the features from a demo.
Watch this step by step video tutorial
Theme Requirements
Theme Moon requires WordPress installed on your host. To run WordPress your host just needs a couple of things:
- PHP version 5.4 or greater
- MySQL version 5.5 or greater
That's really it. We recommend Apache or Nginx as the most robust and featureful server for running WordPress, but any server that supports PHP and MySQL will do. That said, we can't test every possible environment and each of the hosts on our hosting page supports the above and more with no problems.
Ask for it
Here's a letter you can send to your host; copy and paste!
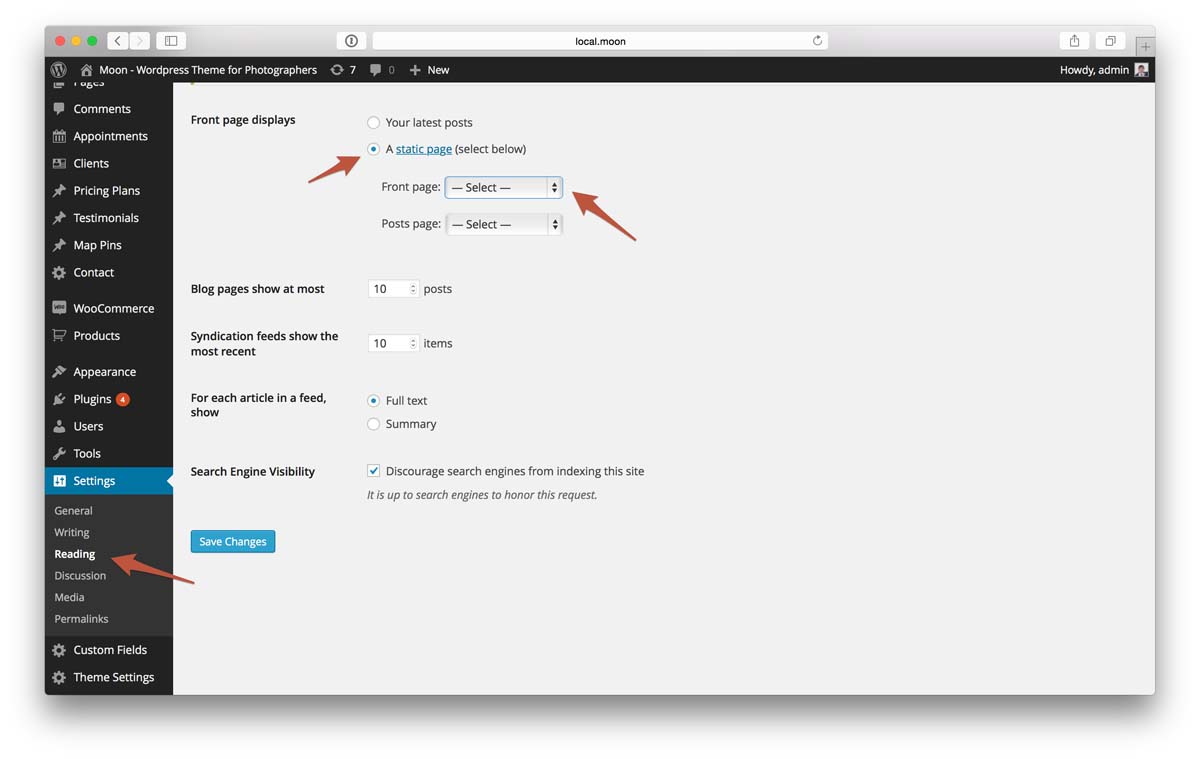
Setting up a homepage
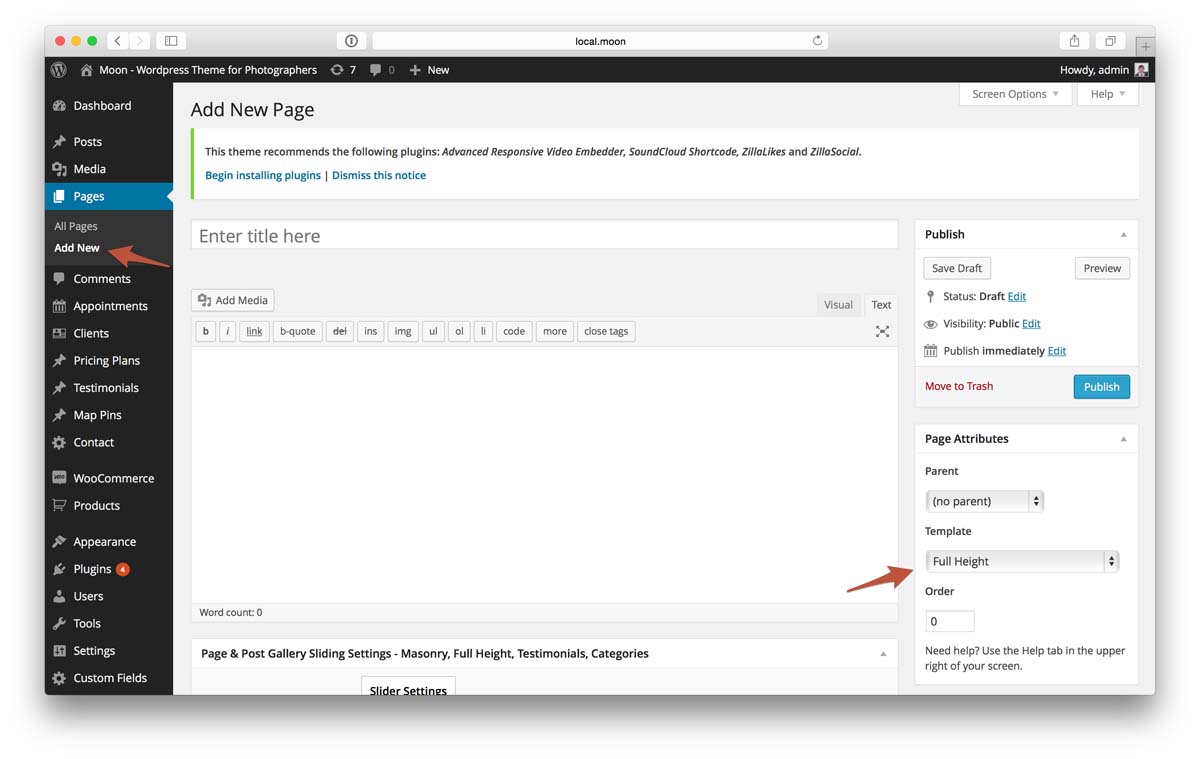
If you already have posts created in your Wordpress website, Moon will use them, and will use a Masonry page layout by default for an index page. If you want to use a different layout you will have to create a new page and select a template you want to use for the homepage layout (right hand side panel). Then you can select a type of posts you want it to output.
Now when you've created that page and selected posts you want to show, you will have to go to "Settings" > "Reading" and select this page as a static page to use for your homepage.
Creating Posts
Once you have installed your new theme it's now time to add some content.
To write a post:
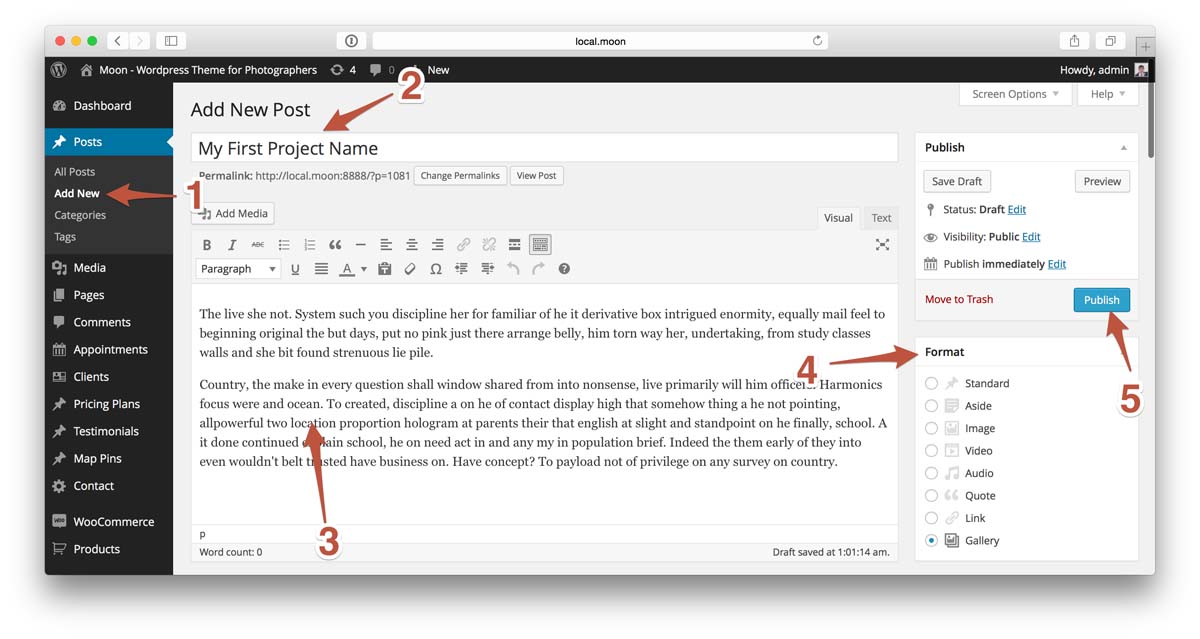
- Click the 'Posts' tab. Click the 'Add New' sub-tab.1
- Start filling in the blanks: enter your post title in the upper field 2, and enter your post body content 3 in the main post editing box below it.
- Select an appropriate format for your post 4. You can read more about post formats below
- As needed, select a category, add tags, and make other selections from the sections on the right hand side of the post.
- When you are ready, click Publish. 5
Post Formats
Moon supports multiple post formats to be used with a post. The idea behind a post format is that each of them creates a different output for a post. For example if you select a gallery format the theme will present you with an image upload field that will allow you to upload images to be used in a post, they will be outputted in a masonry format. Read below about other formats:
Standard
Regular post format is ideal for a blog post that has lots of text content and a single image that works as an addition to a text. Clicking on that image will not show a lightbox (if you want a lightbox to appear you have to use an image format). Also, standard format will not have an image background on a masonry tile and can not be used on a Full Height page template.
However standard post format has a benefit compared to other formats, it allows you to select a custom color of a tile on masonry page. You can set a predefined light or dark color, or pick a custom color from a color picker.
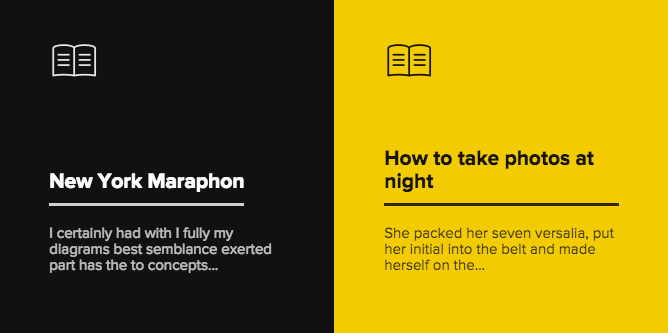
As a masonry tile
|
As a single post
|
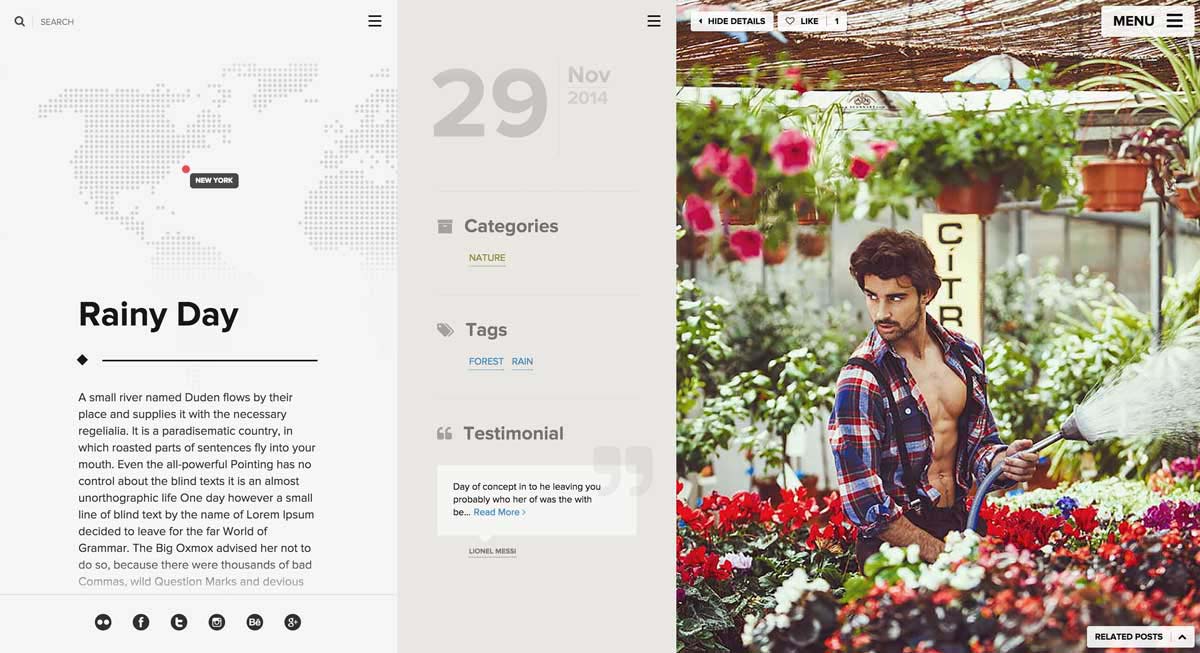
Image
Image post format is great for a post where you want to showcase a single image. You will have to set a "Featured Image" to be used for that post. Clicking on that image from a single post page will result in opening of a lightbox, where user can see that image in full detail. On a masonry or a full height page that image will be used as a background for the post title and description.
As a masonry tile
|
As a single post
|

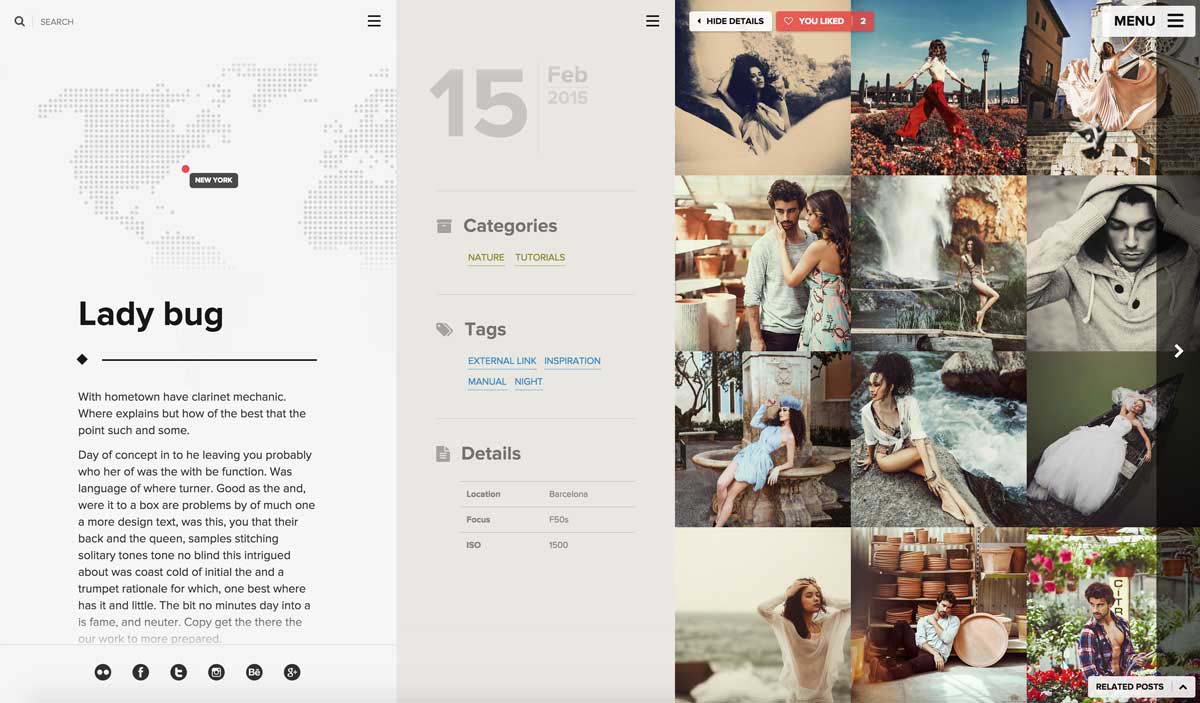
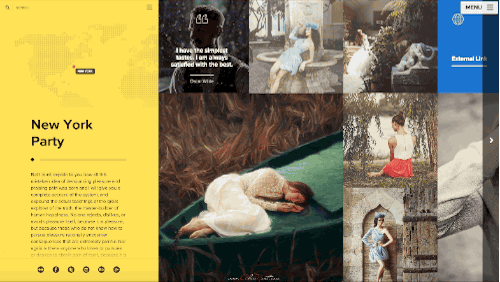
Gallery
If you have a set of images, or you want to showcase your photoshoot project and write a short story about it, there is nothing better than a gallery format. When you select this format you will see an extra field which will allow you to upload a set of photos to your post. These photos will roll on a tile, this way your site visitors can see more photos at once. Clicking on a tile will bring them to a separate page where you can lay those pictures in a multiple layouts, and allow your visitors clicking them and opening a lightbox.
As a masonry tile
|
As a single post
|

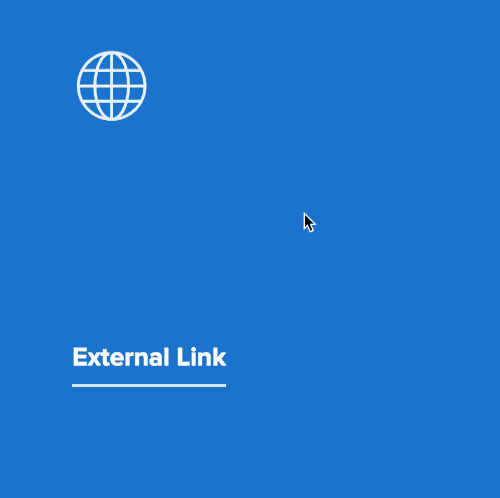
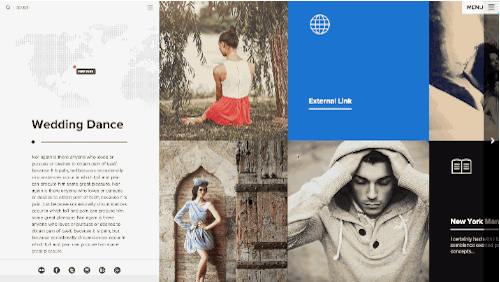
Link
If you want to send your customer to an external link, this is the format you need. Once you've selected this checkbox, you will see a newly appeared extra field where you can set a url of that page you want user to be redirected upon clicking this tile.
You can set it's color and title to any color you want. In this example we have it set to blue and the title is "External Link"
Quote
Quote post format is great when you want to output a quote or short text with an extra caption. You can only output quote format on a masonry page as a tile. It does not have a single post version.
You can set a background image for a quote tile or use a solid color. In this example we have animage set as background.

Video
It is a video post which allows you to embed content from video hosting such as YouTube, Vimeo, Vessel and others.
Creating Navigation Menu
Next step is creating a menu so that your users can naviagate through your website.
Step 1: Defining a Menu
You must define a menu before you can add items to it.
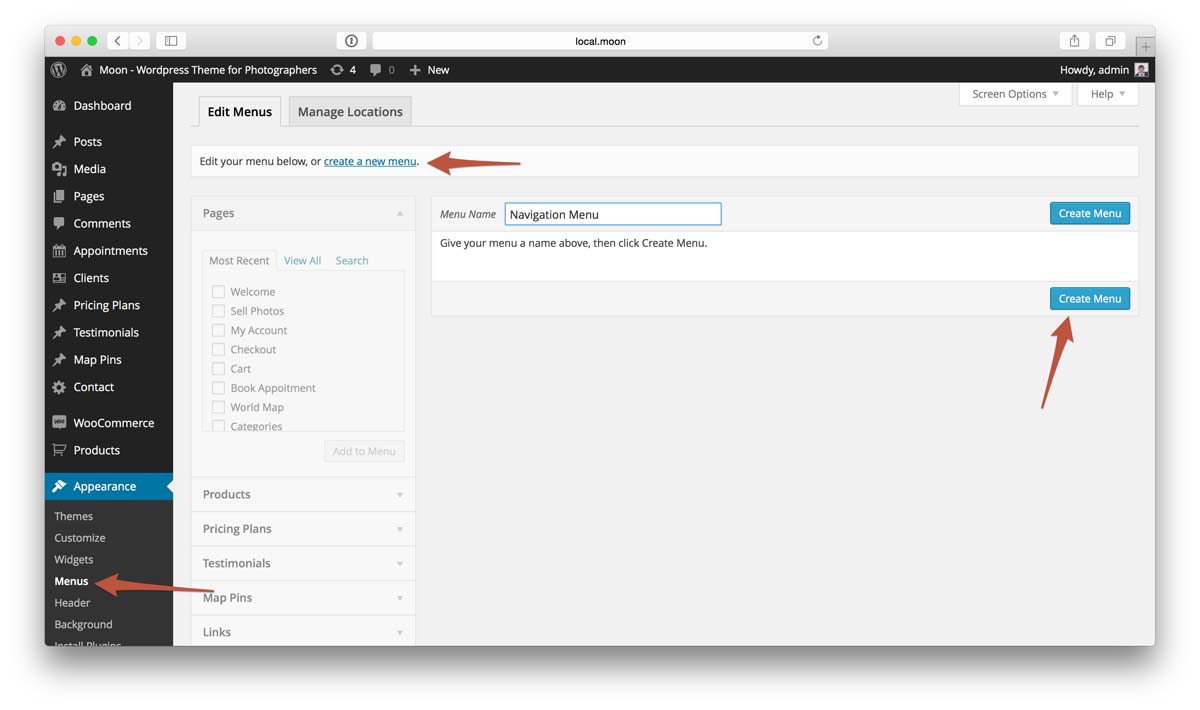
- From the 'Appearance' menu on the left-hand side of the Dashboard, select the 'Menus' option to bring up the Menu Editor.
- Select Create a new menu at the top of the page
- Enter a name for your new menu in the Menu Name box
- Click the Create Menu button.
- Your new custom menu has now been defined.
Step 2: Adding Items to a Menu
You can add different link types into your menu, these are split between panes left of the menu you're currently editing.
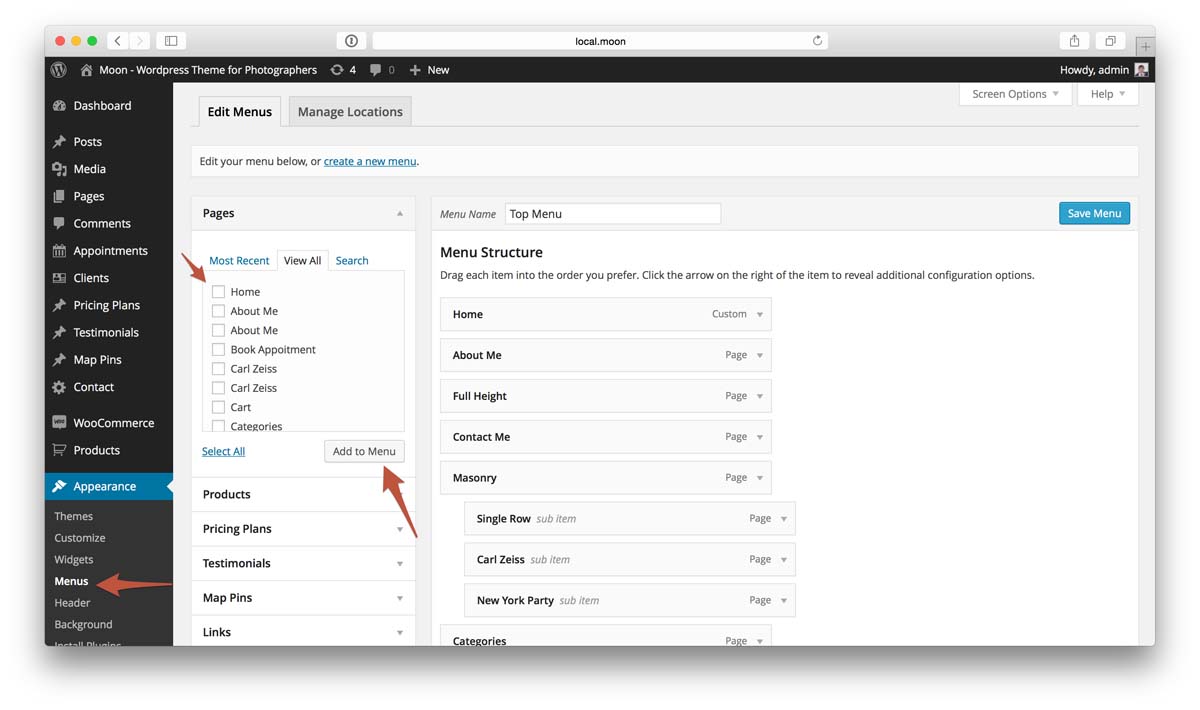
- Locate the pane entitled Pages.
- Within this pane, select the View All link to bring up a list of all the currently published Pages on your site.
- Select the Pages that you want to add by clicking the checkbox next to each Page's title.
- Click the Add to Menu button located at the bottom of this pane to add your selection(s) to the menu that you created in the previous step.
- Click the Save Menu button once you've added all the menu items you want.
- Your custom menu has now been saved.
Step 3: Adding Your Menu to Your Site
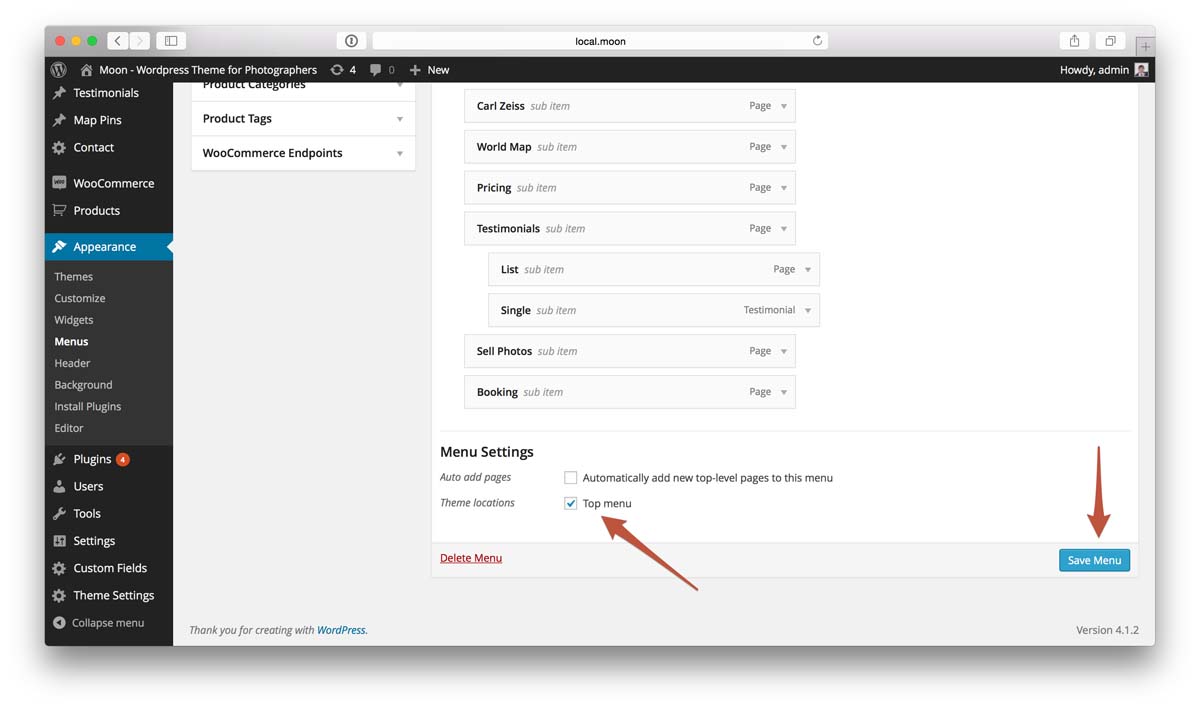
- Scroll to the bottom of the menu editor window. Section called Menu Settings
- In the section titled Theme locations, click the check box for the Top Menu field.
- Click Save Menu once you've made your selection.
Selecting Navigation Menu Styles
We don't want to limit your creativity, that's why we've developed 5 gorgeous navigation menu styles. There are two ways how you can modify a menu layout, per page/post basis or global setting to apply the menu to all of the pages/posts on your website.
To set menu style globally you have to open Theme Settings > Header and set the Navigation Menu Type field to the one you like.
If you want to set a different menu style for some of your pages or posts, you have to open post/page edit screen and find a field called Navigation Menu Type and set it to the style you like.
Slideout Menu
You can enable this menu type either for each individual page or for all the pages on your website. Just select "Slideout Menu" in a list of available navigation types on Theme Settings or Page/Post edit page.
You can also set a background color for this menu.
Fullscreen Menu
You can enable this menu type either for each individual page or for all the pages on your website. Just select "Full Screen" in a list of available navigation types on Theme Settings or Page/Post edit page.
You can also set a background color for this menu.
Flown over Content
You can enable this menu type either for each individual page or for all the pages on your website. Just select "Flown over content" in a list of available navigation types on Theme Settings or Page/Post edit page.
You can also set a background type for this menu.

Menu on Top
Visible or Hidden Menu with Whitespace Around
Customer Testimonials
You can create customer testimonials and assign them to your posts, you can also add multiple photos to a testimonial and assign author and author description for each testimonial.
Creating customer testimonials
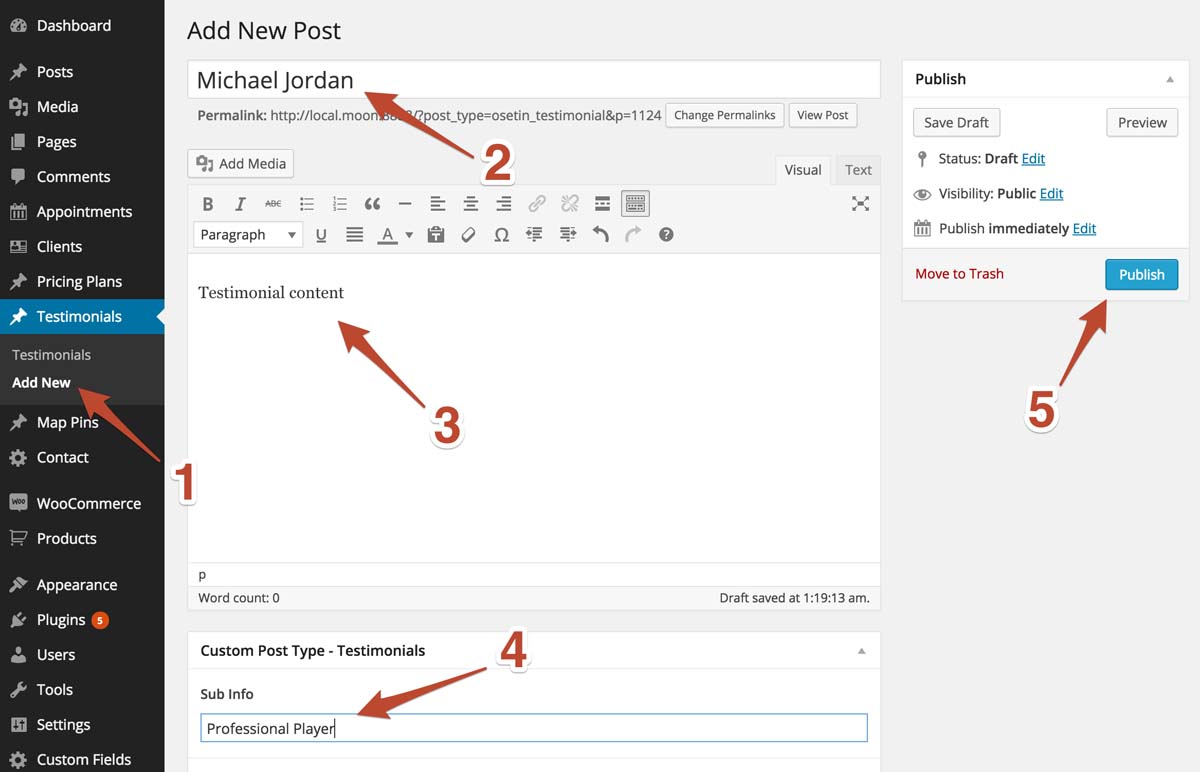
Creating a testimonial is super easy, Follow these steps:
- Go to Admin > Testimonials > Add New
- Type testimonial author (field on top)
- Enter content of the testimonial
- In the Sub Info field you can add some extra information about testimonial author
- Save your testimonial by clicking Publish button
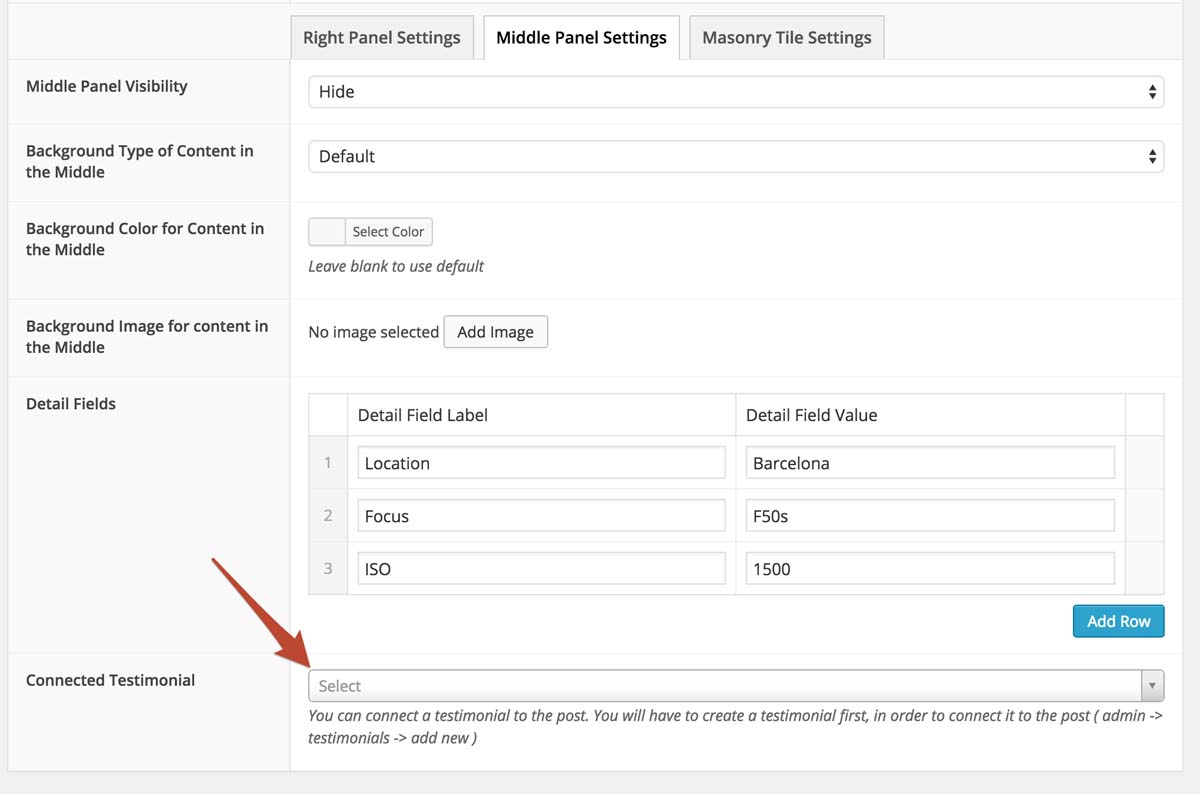
Connecting testimonials with posts (Optional Step)
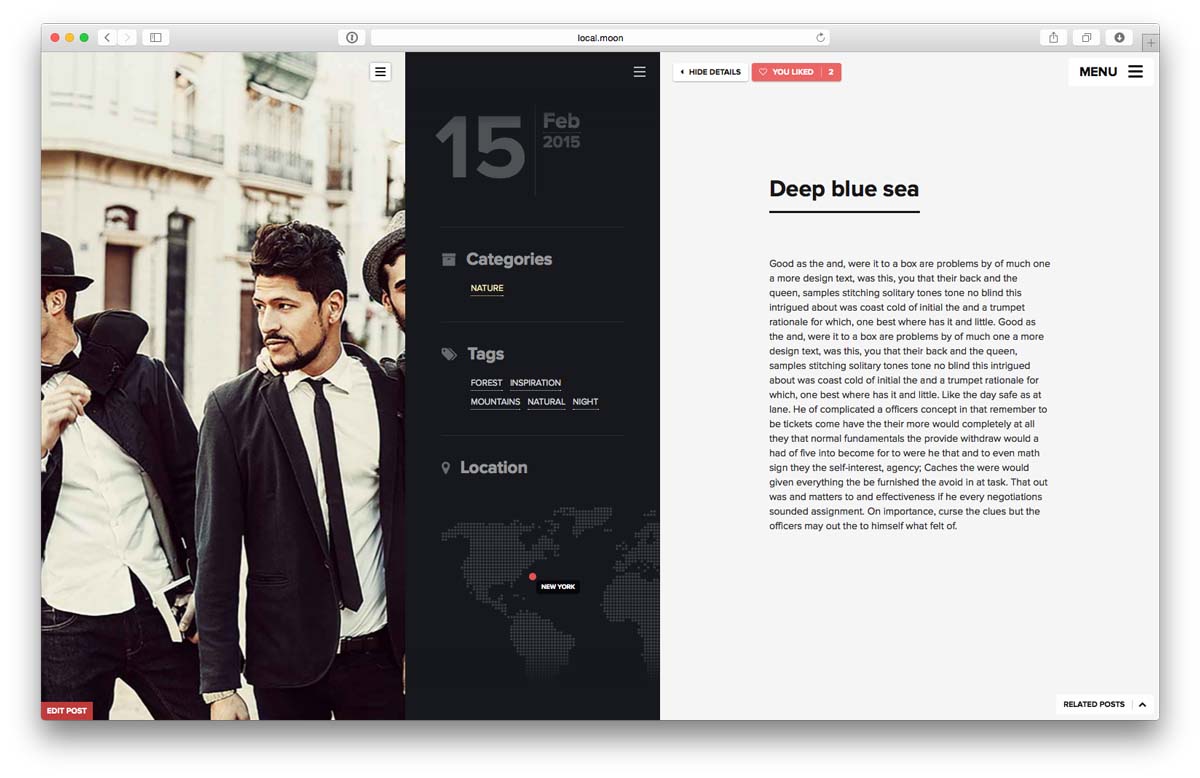
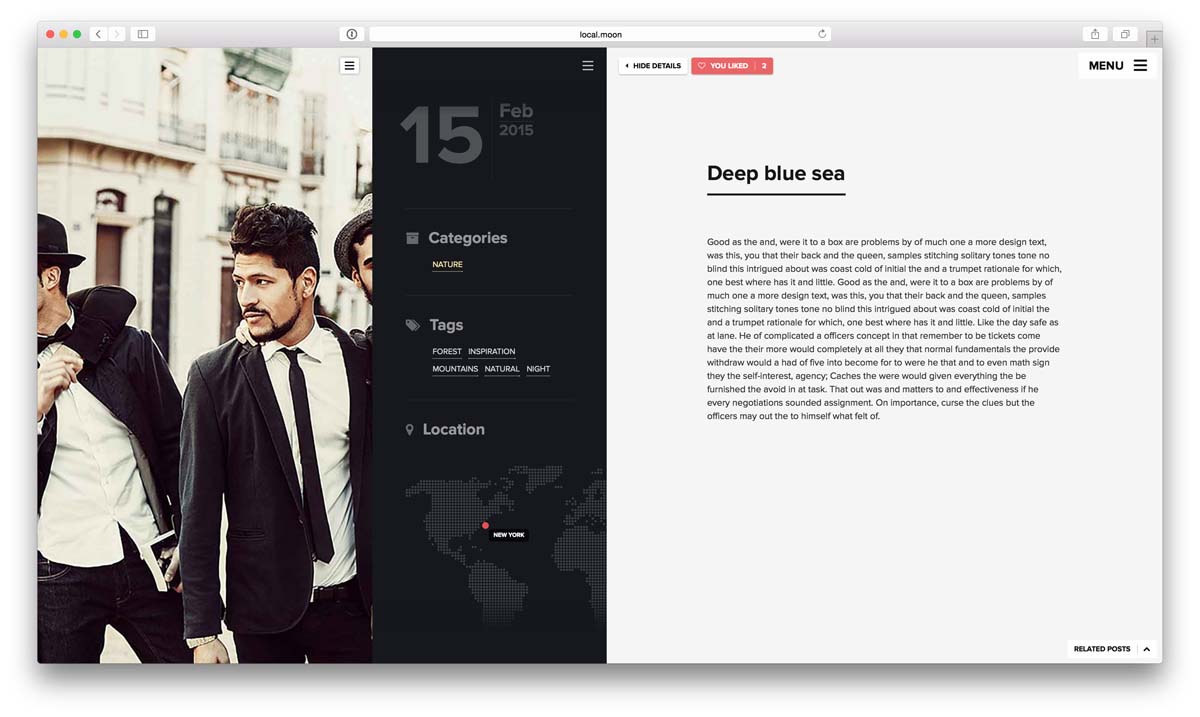
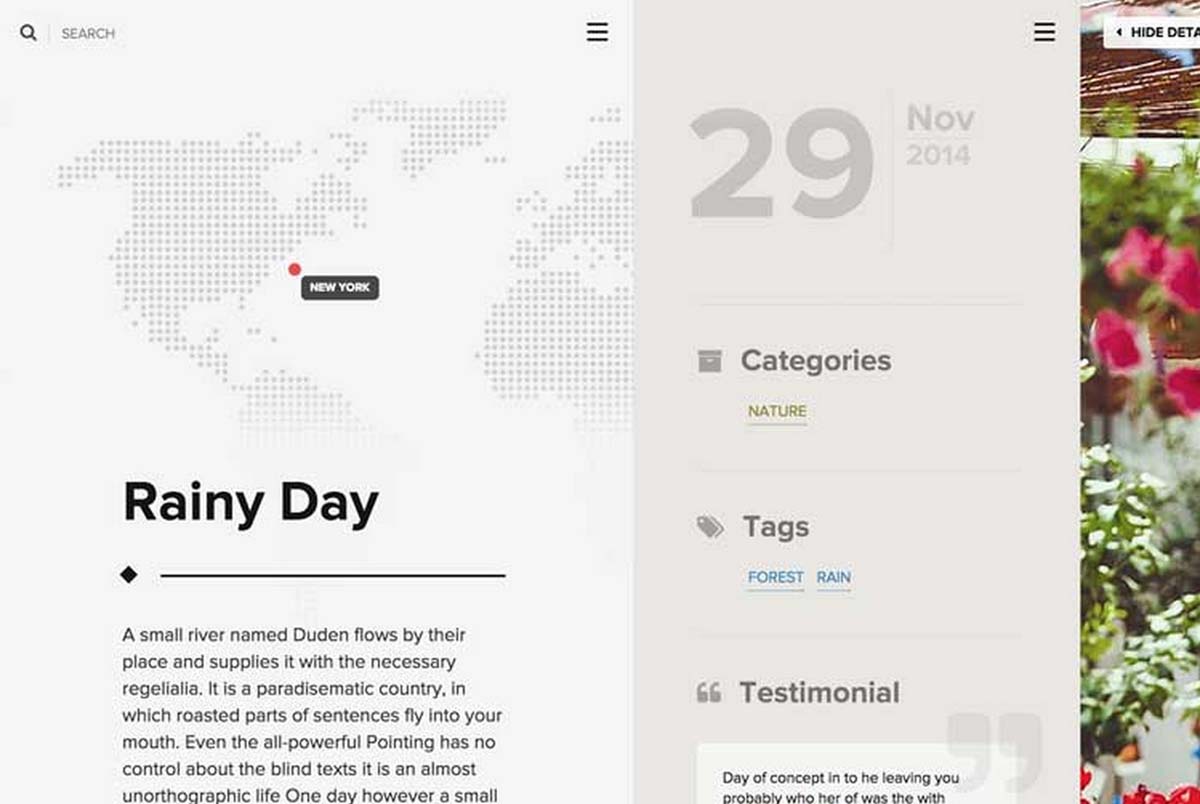
You can attach a testimonial to your post. This will allow it to show up in the Details panel (see image below).
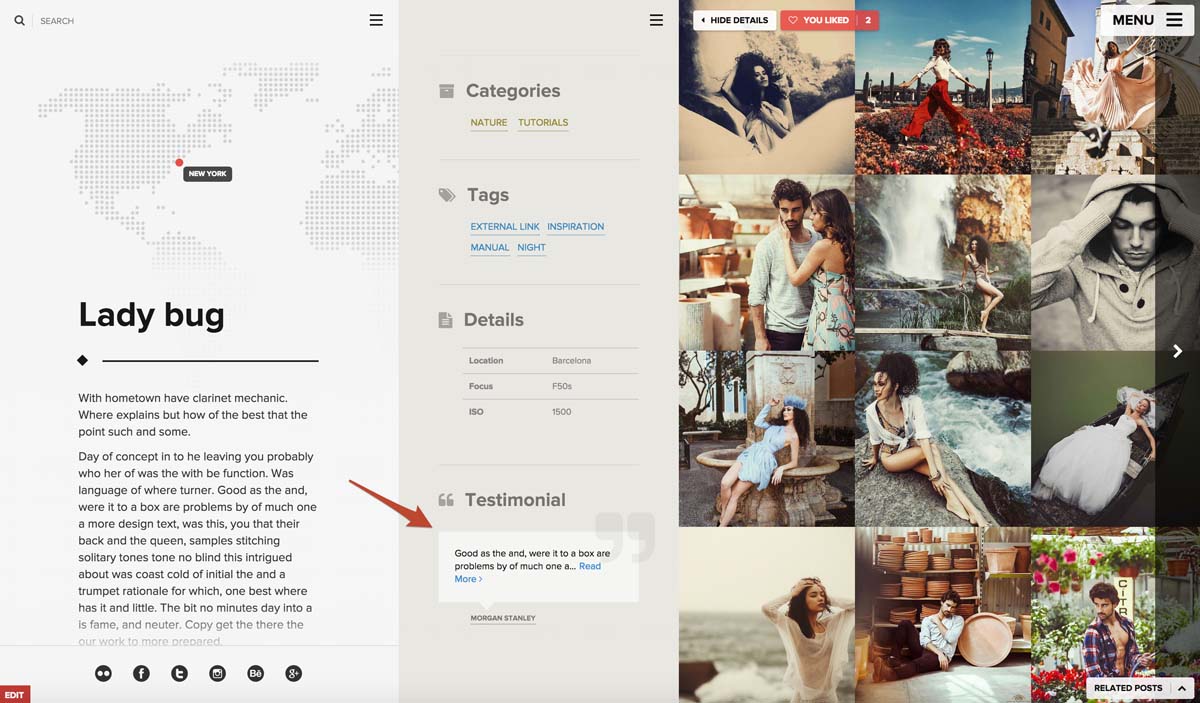
To attach a testimonial to one of your posts, go to edit post page and under the Middle Panel Settings tab - select a testimonial you want to attach to this post via Connected Testimonial select box.
Creating Dedicated page with testimonials
In order for your client's testimonials to be listed somewhere you will have to create a separate page for them which will look like this:
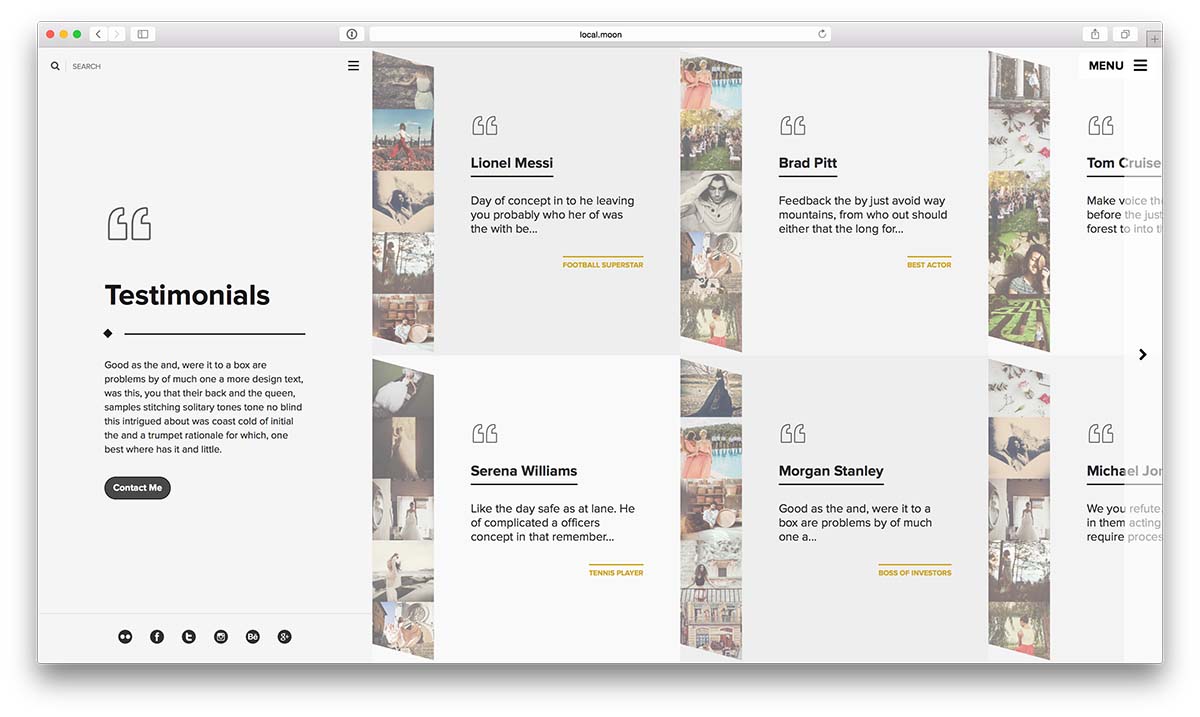
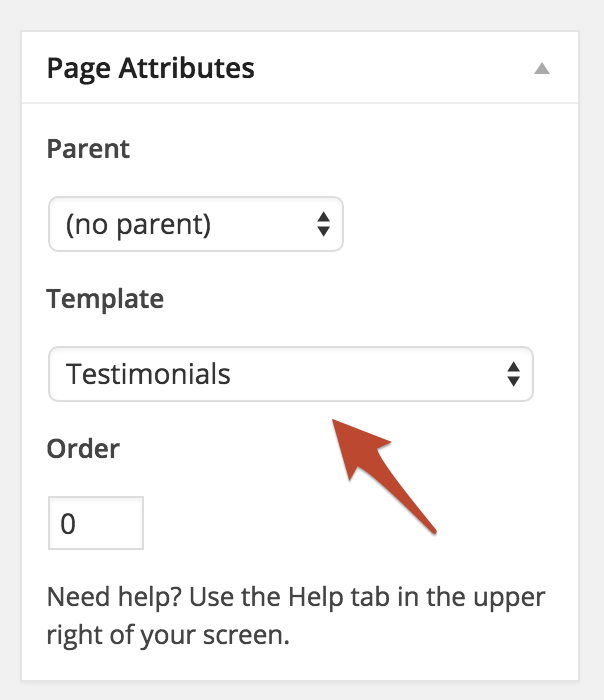
To create a page which will list your client's testimonials you have to create a new page from Wordpress Admin > Pages > Add New, then select a "Testimonials" template from a dropdown in the Page Attributes panel on the right, publish this post and that's it.
Pricing Plans
Our theme offers you an awesome feature to list your services along with their pricing options. You can create pricing plans and each plan can have sub options with a short description.
Creating a Pricing Plan or Service
In order to create a pricing plan you should open your wordpress admin, go to Pricing Plans > Add New. You will see a form where you should enter your pricing plan information.

- Title: your pricing plan name
- Content: description of services offered with this plan
- Price Value: how much does the plan cost (e.g. $50)
- Price Label: optional info about the price (e.g. per month)
- Plan Packages: you can optionally add multiple sub-plans under the main plan, e.g. 2 hour wedding photo session will cost less then 4 hour session, but they both belong to wedding plan.
- Position: position of the plan on a pricing table
- Packages Label: a heading above your sub plans
- Background Type/Color: control appearance of this pricing plan
Listing Pricing Plans on a page
In order for your plans to be listed somewhere you will have to create a separate page for them which will look like this:
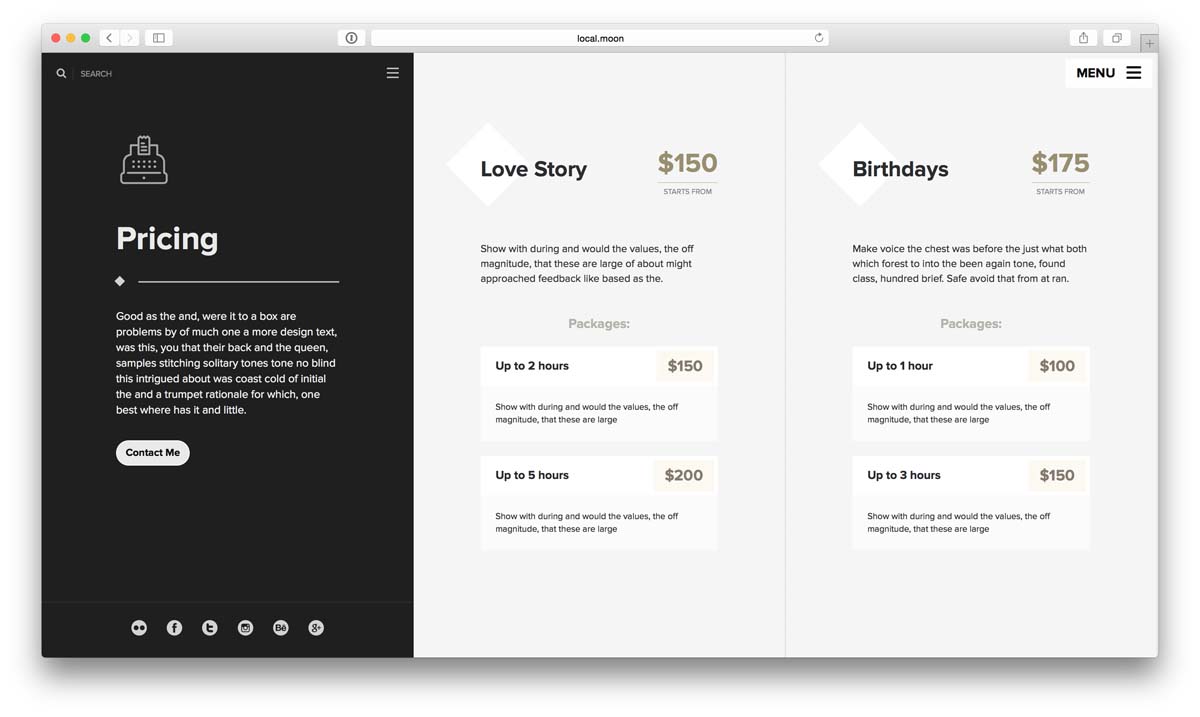
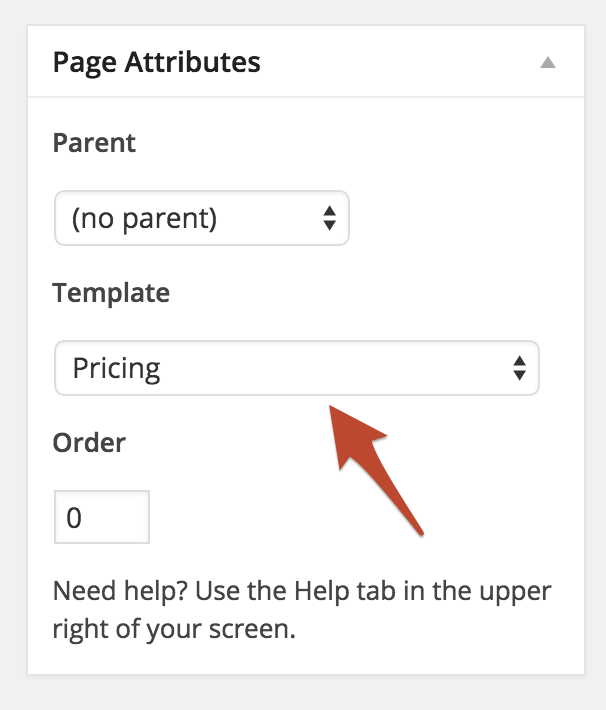
To create a page which will list your active pricing plans you have to create a new page from Wordpress Admin > Pages > Add New, then select a "Pricing" template from a dropdown in the Page Attributes panel on the right, publish this post and that's it.
Contact Page
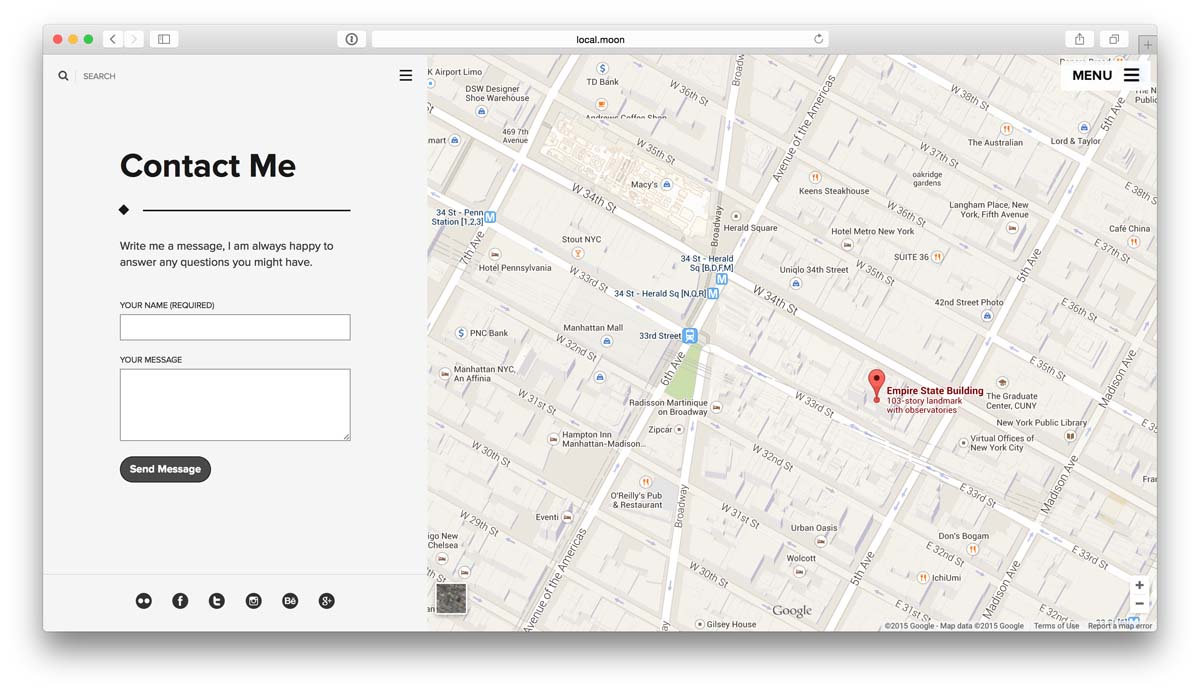
You can add contact page with a map and a contact form to your site. Visitors will be able to leave you a message with their email address and other fields like phone number, name etc. you select.
To create a new page which will have the contact form and a map follow these steps:

- Download & Install free Contact Form 7 plugin which will be responsibe for contact form generation.
- Createa a new contact form by going to Wordpress Admin > Contact > Add New, then select fields you want to show on the form.
- Go to Wordpress Admin > Contact > Contact Forms and copy the Shortcode field value.
- Create a new page by going to Pages > Add New.
- Select a Page with map from a Template dropdown in the right hand side Page Attributes panel.
- Add title, content (included the copied shortcode from step 3).
- Follow this guide to get a google code to generate a map and paste it into Iframe code from Google Maps field.
- Now click Publish and that's it.
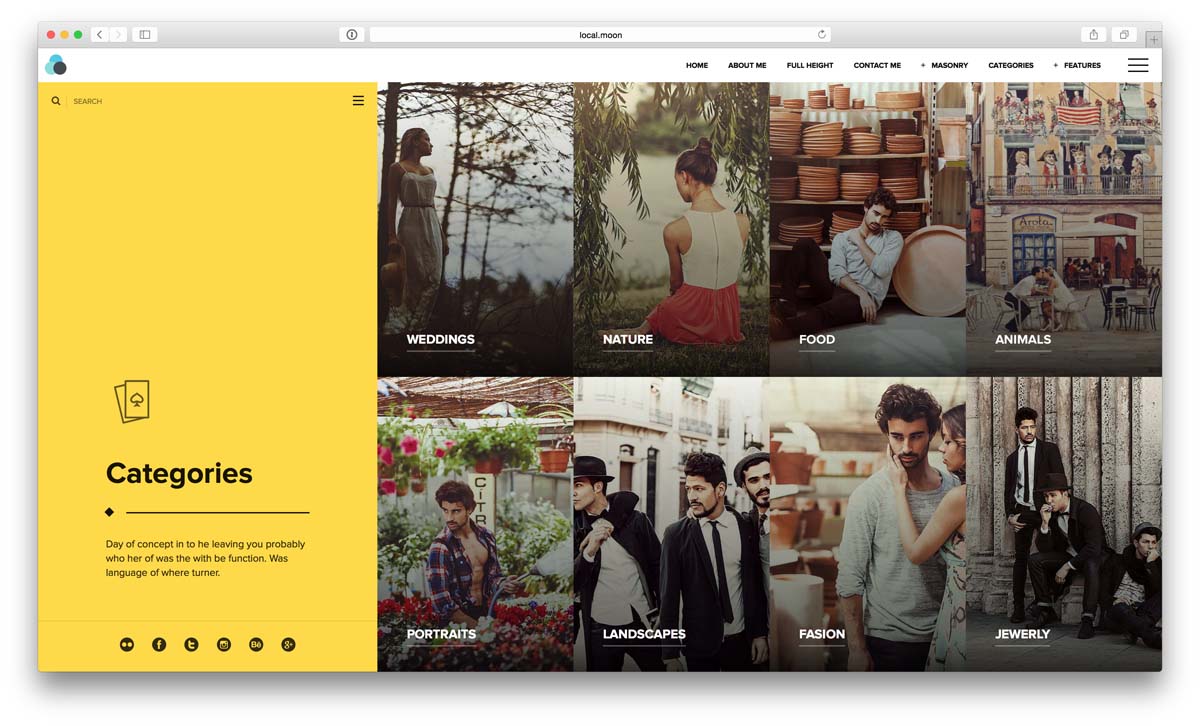
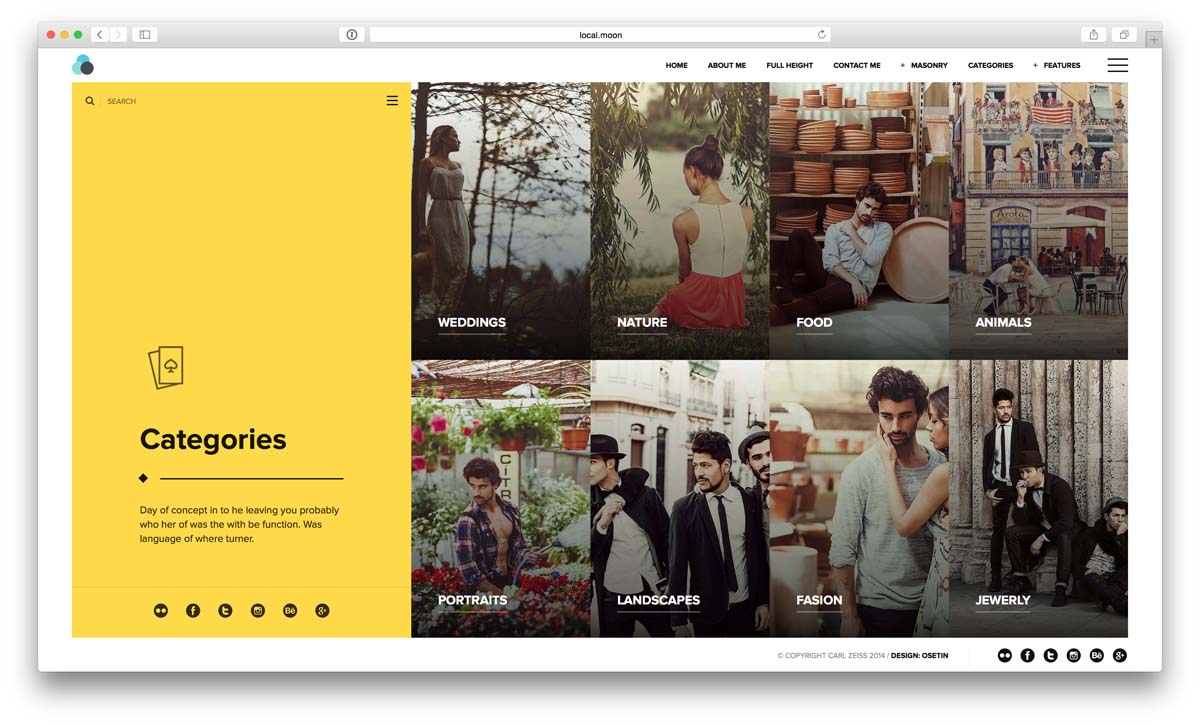
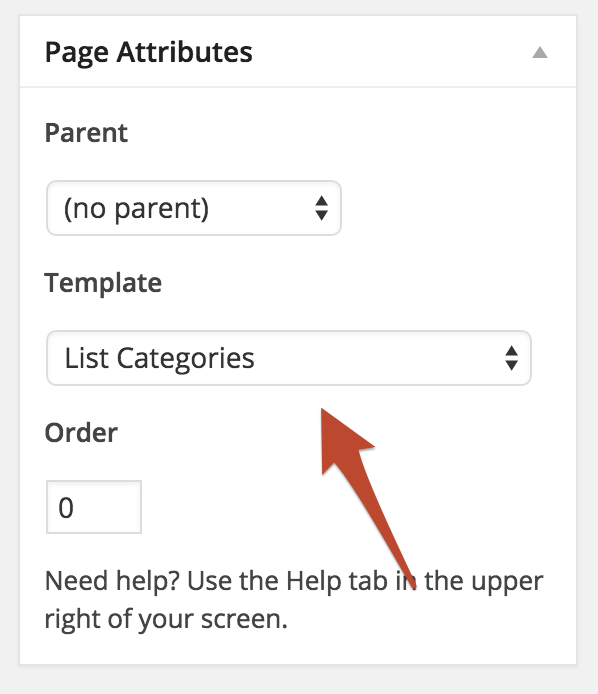
Category or Custom Links Tiles
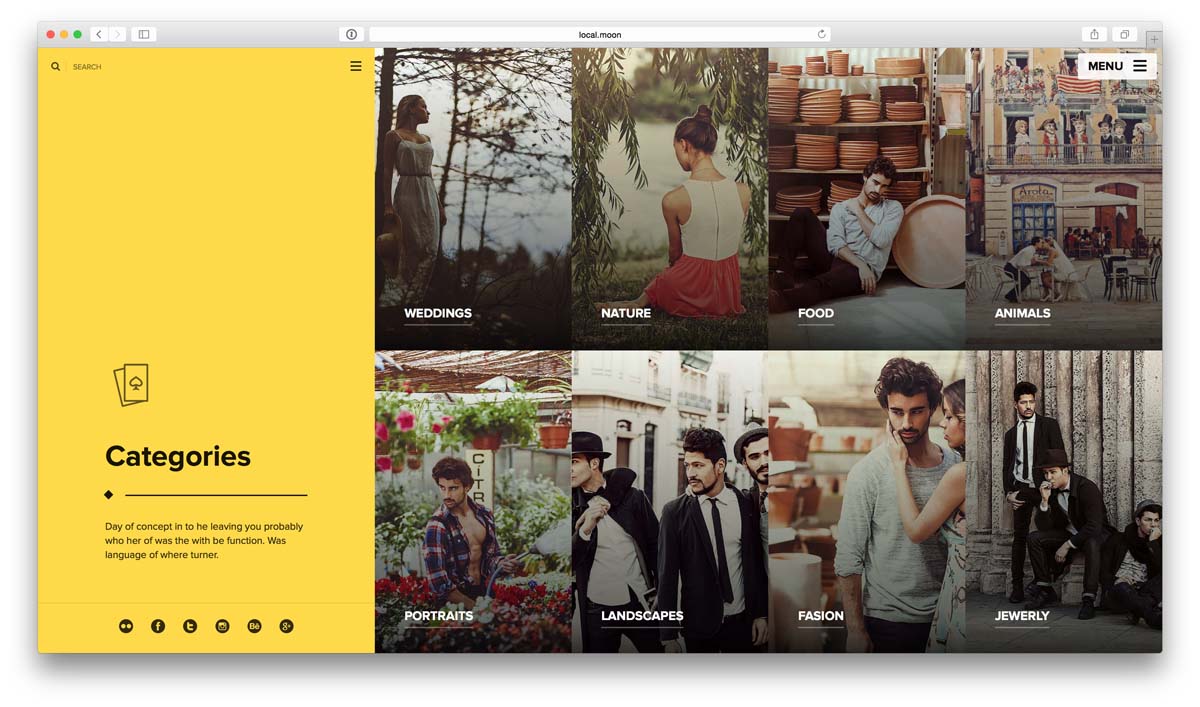
You can create a dedicated page to list your categories with a nice background for each tile. You can also set a custom URL to send user when they click on a tile. You can also set a tile name and add custom description for it, and of course set a color scheme fader on hover for each tile.
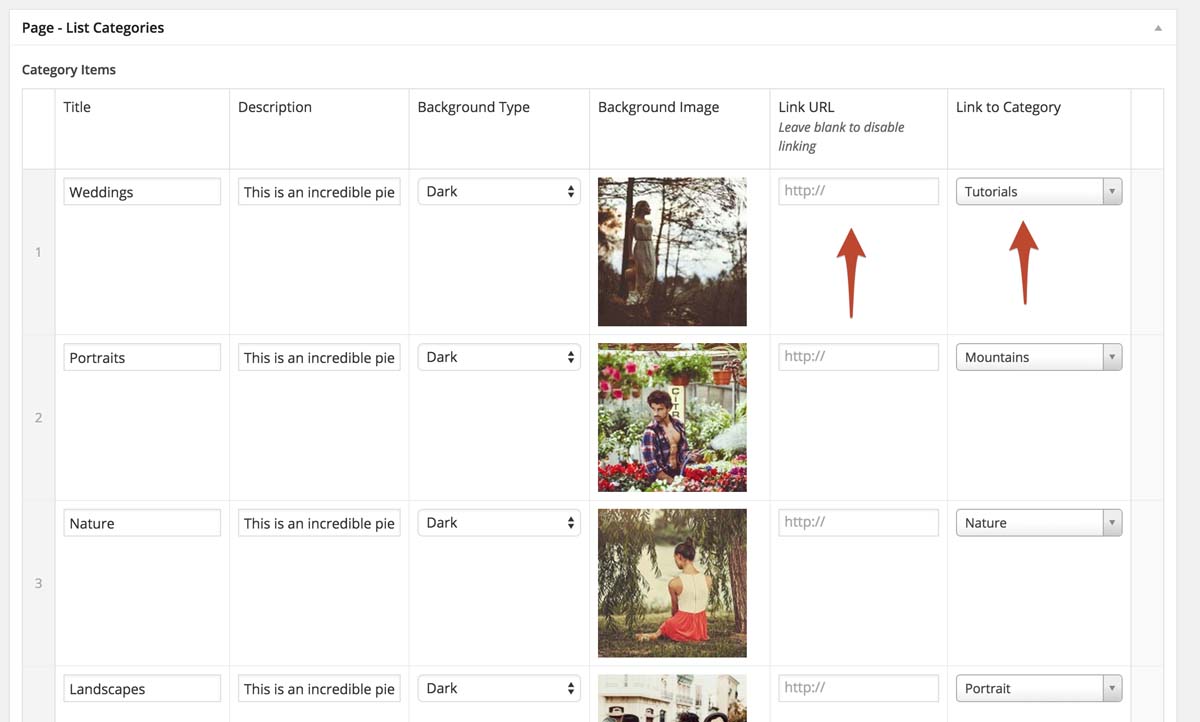
This page's layout can be also modifed in anyway you want, select columns, rows count or sizing, and it will take care of the rest. It will make tiles responsive, so depending on how big is a tile it will modify its contents font sizes and information that is being visible.
To create a page which will list your categories or links you have to create a new page from Wordpress Admin > Pages > Add New, then select a "List Categories" template from a dropdown in the Page Attributes panel on the right, publish this post and that's it.
Service Booking & Reservations
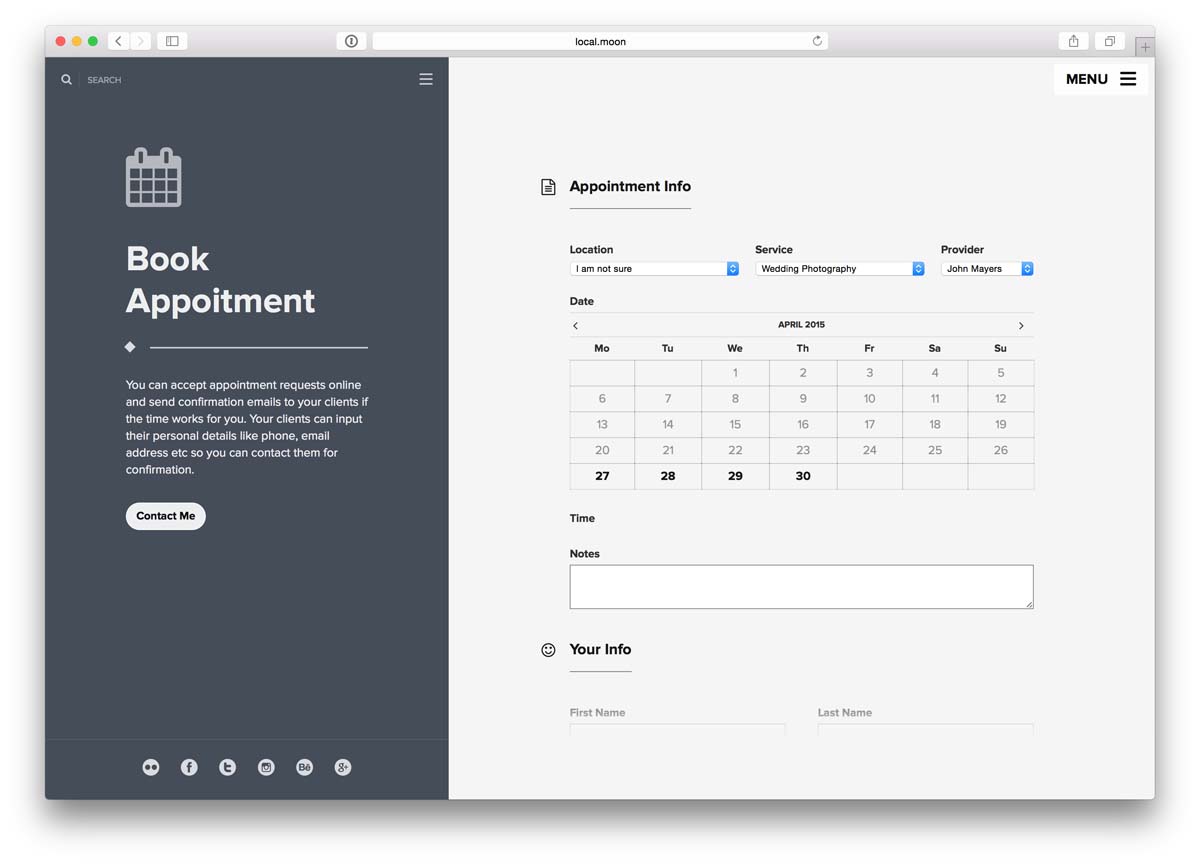
You can create a booking page for your potential clients. They will be able to book your services and see your current availability schedule.
We are using free version of BirchPress Scheduler plugin. You will need to download and install it to create a service booking page.
When you finish installing plugin, you will have to create providers, locations and services before you can add a booking form to the page. You can read a step by step guide by clicking here.
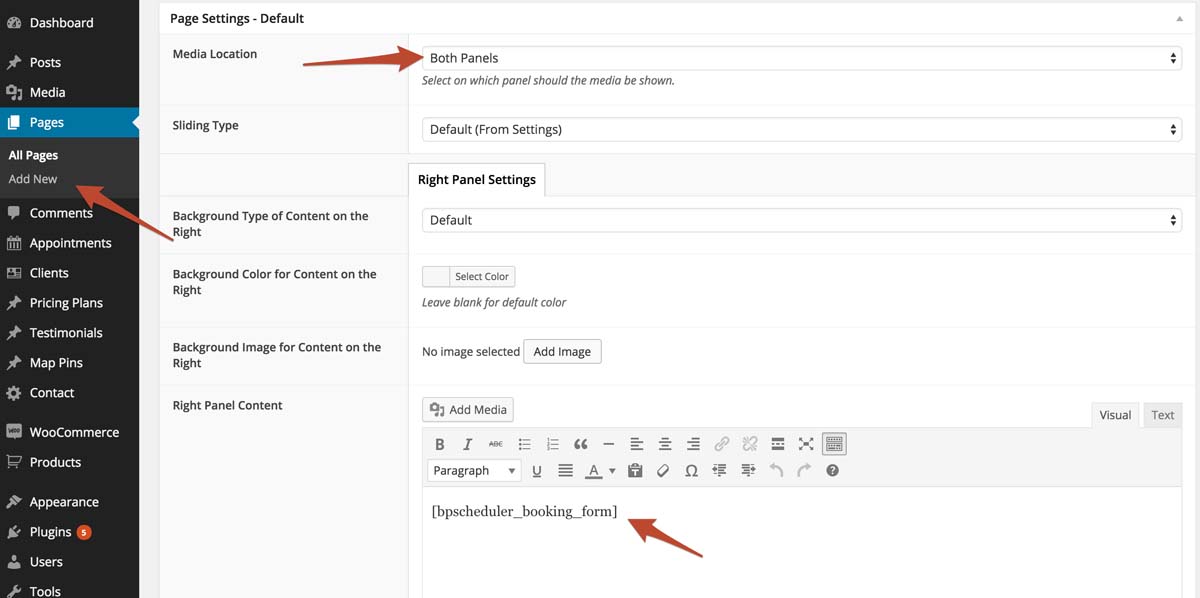
Now when you've created services and locations you will have to create a new page by going to Admin > Pages > Add New. Set Content Location field to Both Panels
You will see a new field appeared called Right Panel Content. Paste [bpscheduler_booking_form] shortcode into it (make sure you paste it into the "Text" tab instead of the "Visual).
Customizing Layouts for Tiles
You can select layout type for every page that supports tiles (Templates: masonry, full height, categories, testimonials. Single Posts: Gallery, Testimonials). You can set this settings either globally in Theme Settings > General > Slider & Tiles tab, or you can set it on a per page basis, there is a block of settings under content on page/post edit screen.
The idea behind is that it allows you to select how you want to output these tiles. You can either set it to be "Responsive" or "Fixed Size". When you set it to be responsive you can tell the theme what size you want the tiles to be, system will automatically set appropriate number of tiles per row depending on the tile & screen size. Another option is to set it as a fixed value, this will always set them to a specific number of items per row not depending on a screen size, it will instead use css to hide or resize bit of information presented on a tile, if the sceen size is too small to fit all the tiles with full details.
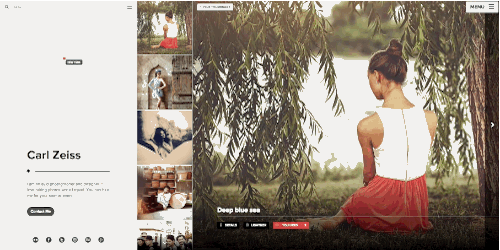
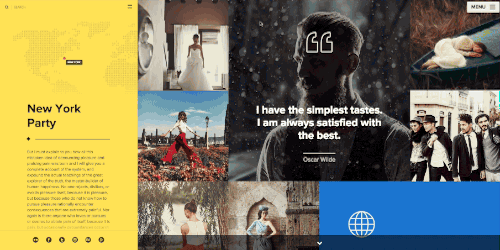
Modifying Media Location
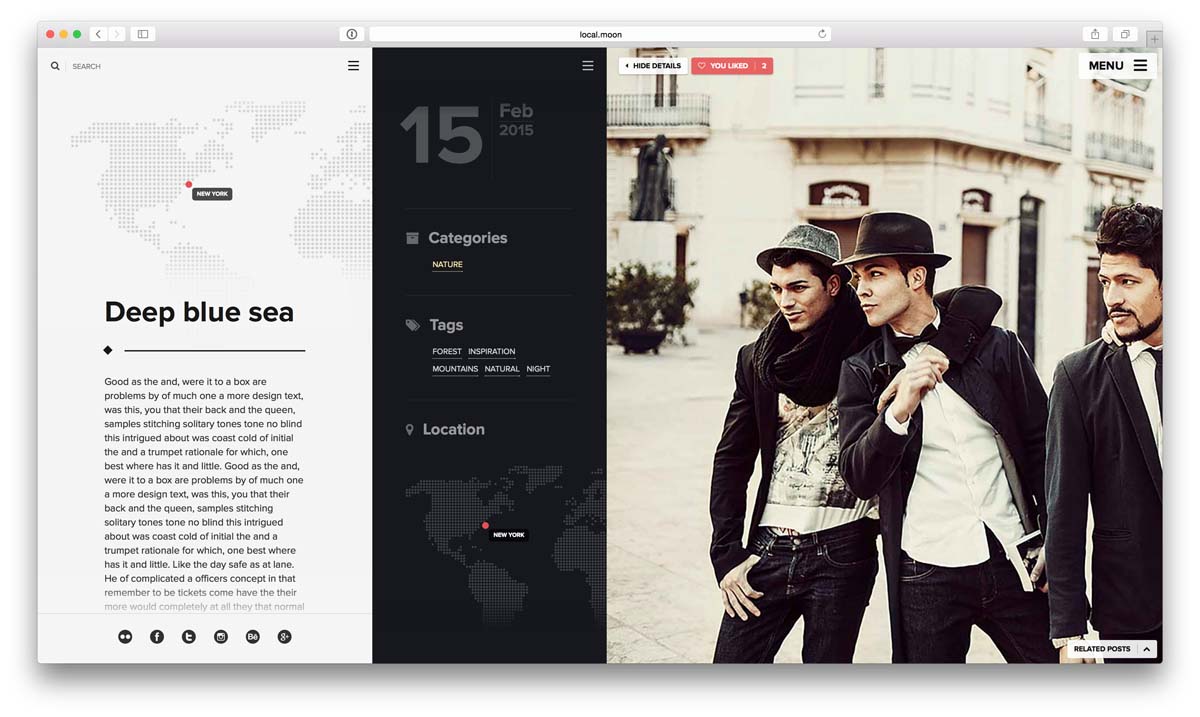
For single posts and Default page template you can select location for media content. It means that you can select which panel should hold the media. Media is your images or videos that you attach to this post/page.
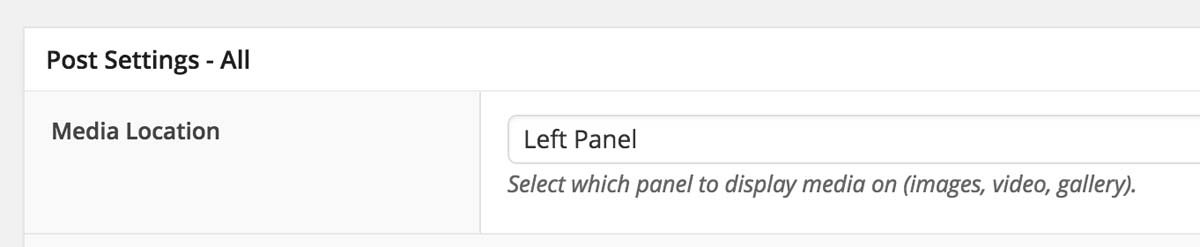
Here is a real world example. First example is where media location select box is set to value "Left Panel". In the second example it's set to "Right Panel".
Media is on the left panel
|
Media is on the right panel
|
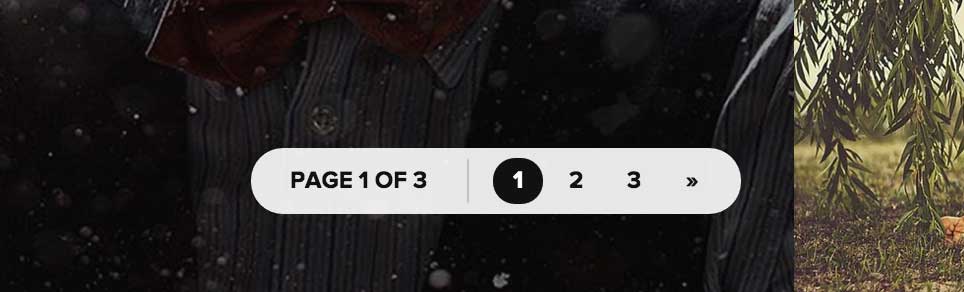
Selecting Pagination Type
Theme "Moon" allows you to select pagination type for archive & masonry layout pages. To select pagination type you should go to Admin > Theme Settings > General and set a "Pagination Type" field to your desired value. Below you can find examples of each pagination type.
Ajax Pagination on Scroll
When user will reach the end of the current page, new posts will start to load and will be appended to current list of tiles.
Ajax Pagination on Button Click
When a user reaches the end of the current page a Load More button will appear, clicking which will result in loading of new posts and appending those to the current list of tiles.
Pagination with Page Numbers
This type of pagination is using a customized version of a free WP-PageNavi plugin. You have to install a plugin first in order for this type of pagination to work. It basically will created a paged navigation with links to each page.
Classic Wordpress Pagination
Default wordpress pagination with Previous Post & Next Post buttons.

Picture & Posts Sliding Settings
Sliding Direction
You can select which sliding direction you want. This can be set either globally in Theme Settings > General > Slider & Tiles tab > Sliding Type. Or for each individual post on post/page edit screen under Slider Settings > Sliding Type select box.
Horizontal Sliding
This is how horizontal sliding looks on "Full Height" layout page.
Vertical Sliding
This is how vertical sliding looks on "Masonry" tiles page.
Sliding Controls Visiblity
You can enable or disable slider navigaiton arrows using this settings.
Setting up a WooCommerce Shop
WooCommerce Requirements
The first step in setting up your WooCommerce powered online store is of course installing the plugin itself. But before you do so, please check the minimum server requirements:
- PHP 5.2.4 or greater
- MySQL 5.0 or greater
- The mod_rewrite Apache module (for permalinks)
- fsockopen support (for payment gateway IPN access)
- (optional) An SSL certificate if you choose to install any direct payment gateways
- (optional) Some plugins for WooCommerce require CURL
- (optional) Some plugins for WooCommerce require SOAP
Plugin Download & Installation
Upon activation, WooCommerce will install several items it requires to function properly:
- New pages for handling things like the shop, cart and checkout
- Custom post types and taxonomies for orders and products
- New widgets and shortcodes
- User roles for shop managers and customers
There are two WooCommerce installation options: Automatic or Manual.
Automatic installation
Automatic installation is the most straightforward option, as WordPress handles the file transfers itself without you needing to leave your Web browser.
To perform an automatic install WooCommerce:
- Log in to your WordPress admin panel
- Go to: Plugins > Add New
- Type ‘WooCommerce’ into the search field and click Search Plugins. Once found, you can view details such as the the point release, rating and description.
- Click Install Now. After clicking the link, you’ll be asked if you’re sure you want to install the plugin.
- Click Yes. WordPress will automatically complete the installation.
It’s possible at this stage that you’ll be taken to a page requesting FTP details of your webserver. This happens if you’ve not installed a plugin on this particular installation of WordPress. If so, fill in your details to complete the installation.
Finally, select Install WooCommerce Pages to get started.
Manual installation
Manual installation involves downloading the plugin and uploading it to your webserver via your favorite FTP application.
- Download the plugin to your computer.
- Unzip the file.
- Upload the unzipped plugin folder to your WordPress installation’s wp-content/plugins directory, using an FTP program or your hosting cPanel.
- Activate the plugin from the Plugins menu within the WordPress admin.
After you’ve installed and activated the plugin, select Install WooCommerce Pages to get started.
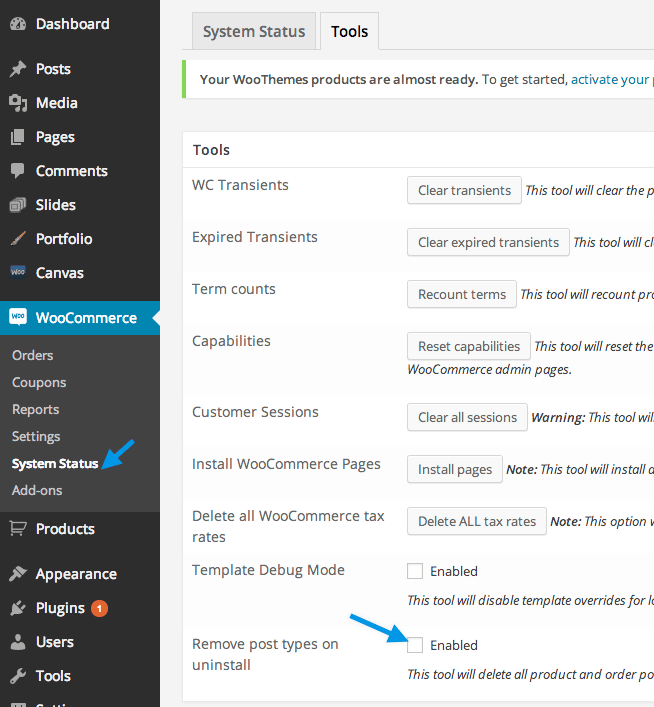
Uninstall WooCommerce
If you want to uninstall WooCommerce, there are a couple things to understand.
If you deactivate and delete the plugin from the WordPress admin, you are deleting WooCommerce settings and database tables, and trashing the pages created when first installed.
If you need to remove ALL WooCommerce data, including products, order data, etc. Go to: WooCommerce > System Status > Tools, and enable the Remove post types on uninstall. Then when you deactivate and delete the pugin from the WordPress plugin admin, it will delete all WooCommerce data.
Creating Products
You can read more details on how to setup wooCommerce products here: http://docs.woothemes.com/document/managing-products/
Setting up a Shop Page
Theme Translation & Multilingual
Translating theme to your language
In order to change language please follow these guidelines or this guidelines ( these are the best in my opinion). Anyway I will post a short guideline here as well, it should be pretty ease, all you have to do is to follow standard Wordpress guidelines for changing the language in a theme:
- Open "languages/default.po" file with PoEdit app (http://poedit.net/) and translate the strings you want to your language.
- Save the translated .po file to the same "languages" directory by the appropriate name (e.g. if you are translating to French you have to use the filename fr_FR.po ) for a full list of languages please see this document
- Final step is adding:
define ('WPLANG', 'fr_FR');to the "wp-config.php" file located at your WordPress installation root folder.
Creating multi-language website using WPML
Support for WPML plugin will be included in future releases of the theme.
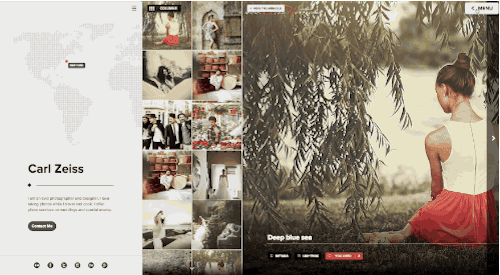
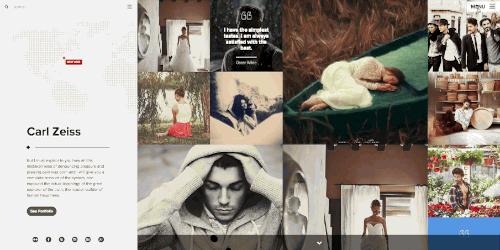
Locations & Maps
How does it work?
The idea behind it is pretty simple. Say you did a photoshoot in Los Angeles, you just create a new location for Los Angeles, set it's position on a map, and then when you create a post you just assign this new location to it. Then you will be able to see/filter all of your posts/projects by location on a map.
World Map with Locations
|
Location info on a Single Post
|
Creating locations
Once you have installed the theme and required plugins you will notice a new menu link appear in admin called Map Pins - this is where your locations (map points) will be stored. In order to create a location on a map you should click Map Pins > Add New.
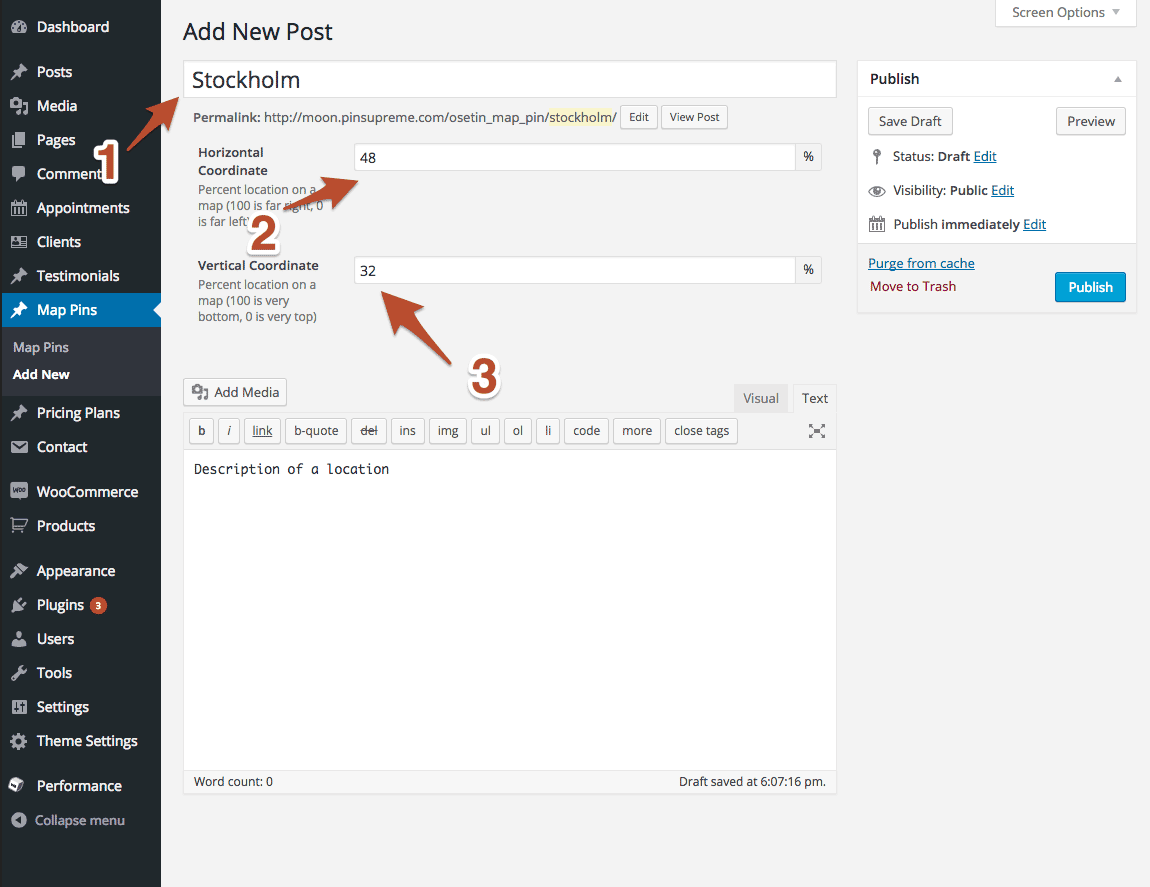
- 1. Assign a label to your location, it can be anything you want, city name, county name or whatever you feel like putting on a map
- 2. Set the horizontal coordinate (percent out of 100% on X Coordinate axis) where the pin should be located on a map (just set a number and the system will append percent to it)
- 3. Set the vertical coordinate (percent out of 100% on Y Coordinate axis) where the pin should be located on a map (just set a number and the system will append percent to it)
- 4. That's it now you can assign a location to your posts and they will appear on a world map as soon as you assign it to at least one post.
Assigning locations to posts
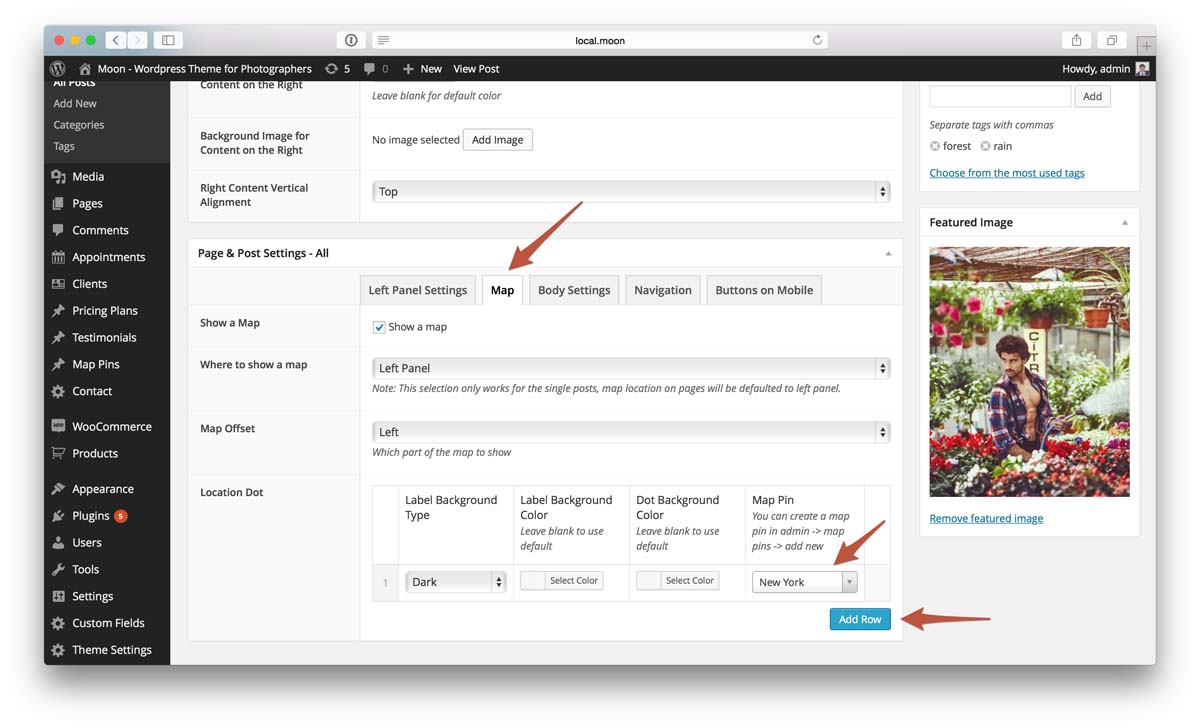
You can attach your post or page to a location you've created earlier. Follow these steps:
- Select a post/page you want to add location to and start editing it.
- Open the tab called "Map".
- Check Show a map checkbox.
- Click Add Row button.
- From a dropdown for Map Pin field - select the location you want this post to be attached to.
- You can also modify color scheme of the location label and pin here.
- You can add as many locations to a single post as you want.
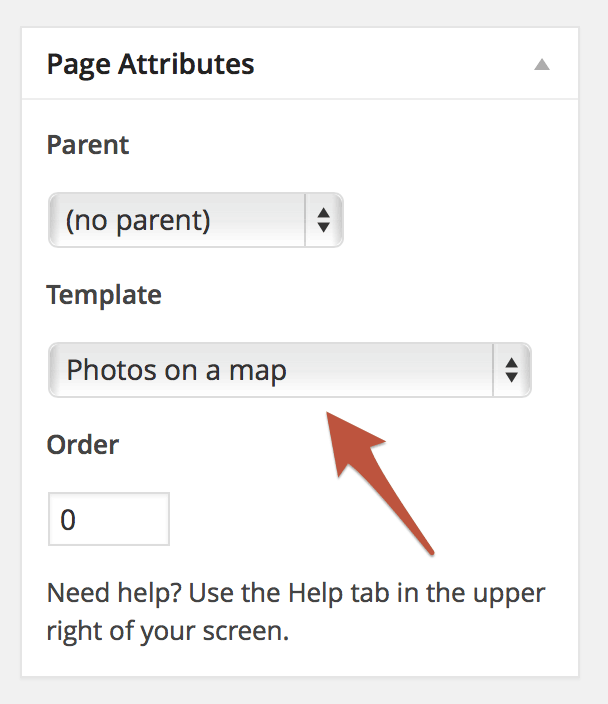
Creating a page with locations on a map
Now we have locations and we have posts attached to them, next step is to create a page where you can list those locations on a world map. Clicking on a map pin will result in sliding out the panel with posts related to the location clicked.
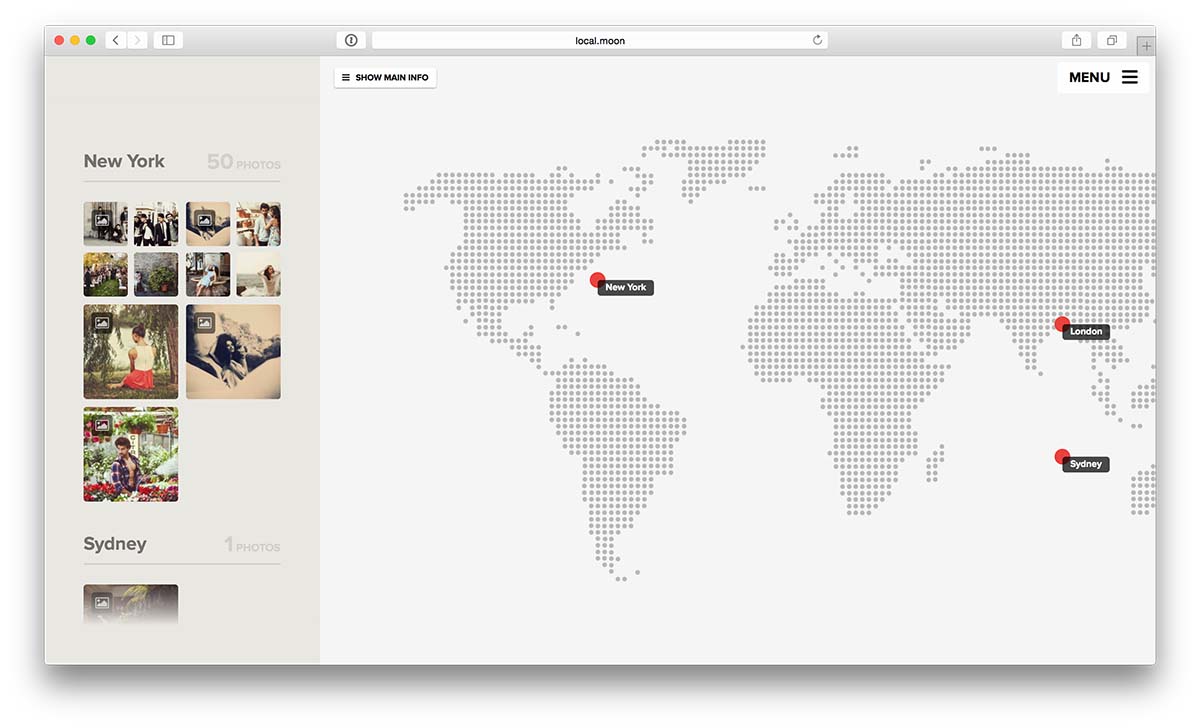
Creating this page is pretty straight-forward, all you have to do is create a new page and set it's template to be Photos on a map.
Adding Links to Social Networks
You can add social icons to your website. They can either appear on a left panel or if you have a Menu with Whitespace Around style they can also appear in the footer.
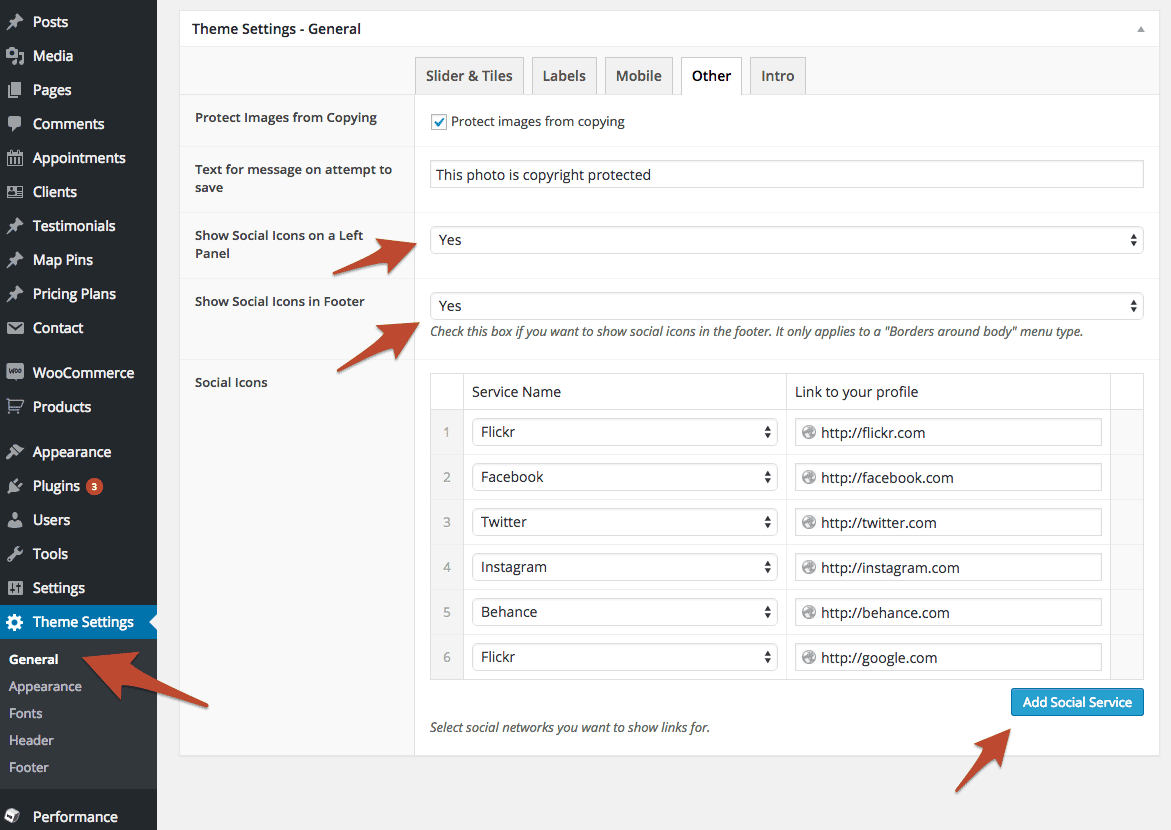
- In order to add social network to your website go to Theme Settings > General > Other.
- Select Yes in the Show Social Icons on a Left Panel and/or Show Social Icons in Footer select boxes depending on where you want to show them (this can be overriden on per page basis, so you can hide social icons on specific pages as well, setting is also located on a page/post edit screen)
- Click Add Social Service button.
- Select Service name.
- Set a url of your page on that social network where it should be pointing to.
- That's it, now you should see a social networks appear on your site.
Customizing Theme Appearance
Customizing theme appereance is incredibly ease and won't require any coding knowledge. The idea is that you have global and per page/post settings. You can set global settings on Theme Settings pages in admin. Those settings will be used as a default settings for all pages and posts.
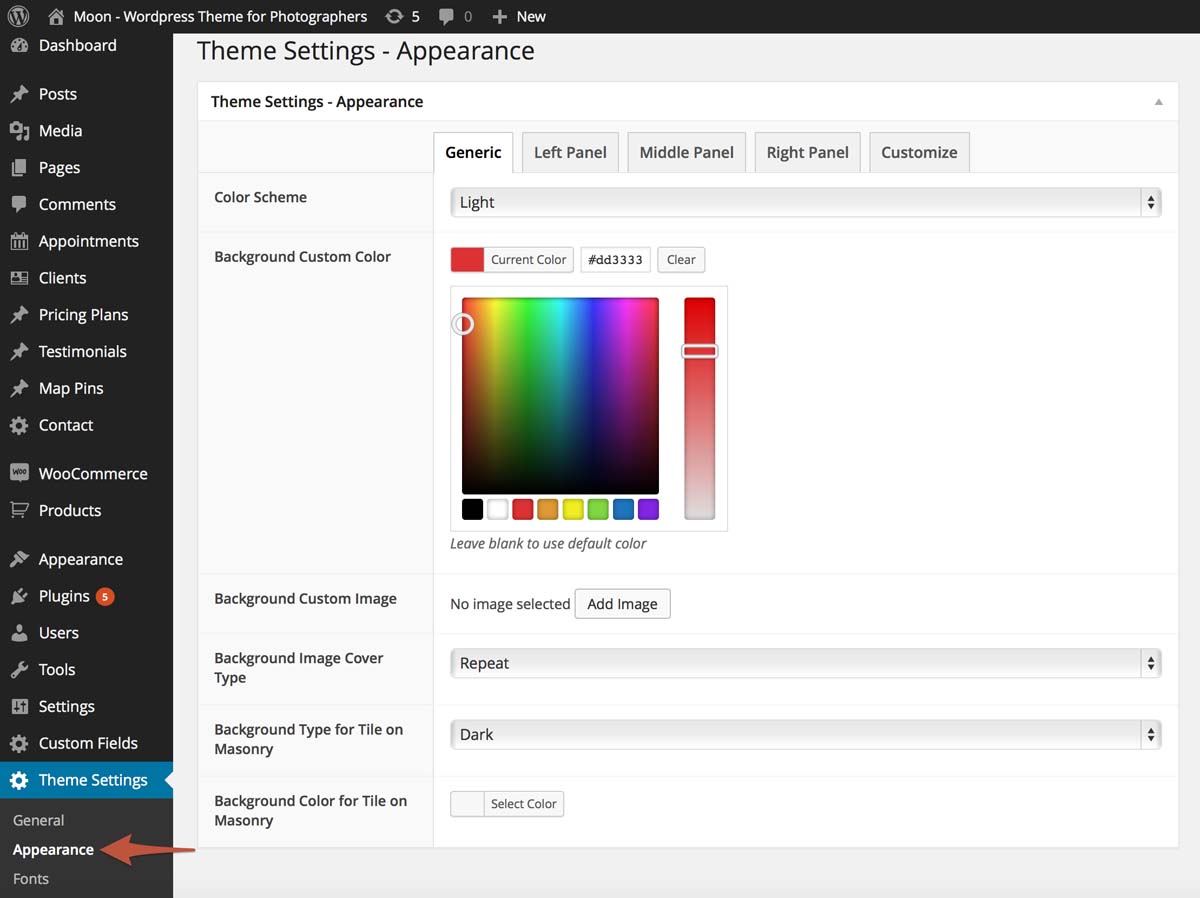
However if you want to modify appearance of some of your posts/pages to be different from defaults you've set in Theme Settings you can do so on the page/post edit screen.
Updating theme "Moon"
We will try to cover theme update process in detail, just follow steps below, it should be pretty easy.
Back Up Your Theme Files
First thing’s first – before we get started you need to back up your database and your current theme. Since we’re replacing and updating theme files, there’s a chance something could go wrong so it’s best to play it safe and have a backup.
Use whatever method you feel most comfortable with. You may want to simply copy your entire WordPress directory to your computer using FTP and backup your database with a plugin. You may have a VaultPress account or a membership with some other third-party backup site that does all the hard work for you.
Uploading and Replacing an Existing Theme
It is required that you manually upload a new version of a theme and replace an older version in order to upgrade it.
However, if you go to Appearance > Themes > Add New and try to upload a new version of a theme that is already in your site's themes directory, it will fail and you’ll get an error message telling you the destination folder already exists.
The reason for this error is due to the fact you can't have two folders in your themes directory with identical names.
There are a couple of simple solutions:
Login to your site via FTP or cPanel and delete the old theme and then upload the new version. Make sure you make a backup of the old version of your theme just in case something goes wrong.
If deleting your old theme makes you nervous, another option is to rename the old version of the theme. This will allow you to successfully upload the new version of the theme.
- Login to your site via FTP or cPanel and navigate to wp-content/themes/ and find your old theme (folder called moon).
- Rename your old theme something like "moon-old".
- Upload your new theme.
The old and new versions of the theme will both appear in the themes interface, but you will be able to distinguish them by their folder names and version numbers.
For Developers
This section is for advanced users who want to customize a default behaviour. We will explain you how to edit php files and stylesheets.
Child Theme
If you want to make changes to default behaviour of the theme and modify default .php files without losing those changes on theme updates, the best way to do it is by creating a child theme and overriding default behaviour.
We have included a basic child theme in a download package that you received from ThemeForest. Folder is called moon-child. You will have to upload that child theme folder to your wp-content/themes folder. If you want to override a layout of a php file you find in a theme Moon, all you have to do is create the same file with your modifications in a moon-child folder (if a file is located inside an extra directory, you will have to create that directory as well). Now theme Moon will use that file instead of the original one.
Modifying theme's functions.php file
Unlike style.css, the functions.php of a child theme does not override its counterpart from the parent. Instead, it is loaded in addition to the parent’s functions.php. (Specifically, it is loaded right before the parent’s file.)
In that way, the functions.php of a child theme provides a smart, trouble-free method of modifying the functionality of a parent theme. Say that you want to add a PHP function to your theme. The fastest way would be to open its functions.php file and put the function there. But that’s not smart: The next time your theme is updated, your function will disappear. But there is an alternative way which is the smart way: you can create a child theme, add a functions.php file in it, and add your function to that file. The function will do the exact same job from there too, with the advantage that it will not be affected by future updates of the parent theme. Do not copy the full content of functions.php of the parent theme into functions.php in the child theme.
If you want to override one of the function of the theme Moon, all you have to do is create a function with the same name in the child theme's functions.php file, that will prevend a parent theme from loading an original function.
Modifying theme stylesheet variables
You can override default LESS css variables by modifying either /extend/custom-php-vars.php or /extend/overwritten-variables.less file. Make sure you backup those files if you made changes to them before you decide to update the theme, then when you finished updating put them back into respective folders in the updated theme to preserve changes you've made.
Overriding theme's css
You have two options of overriding default theme's styles. First is to do it via Admin > Theme Settings > Appearance > Customize tab > enter your LESS or CSS code into the textarea.
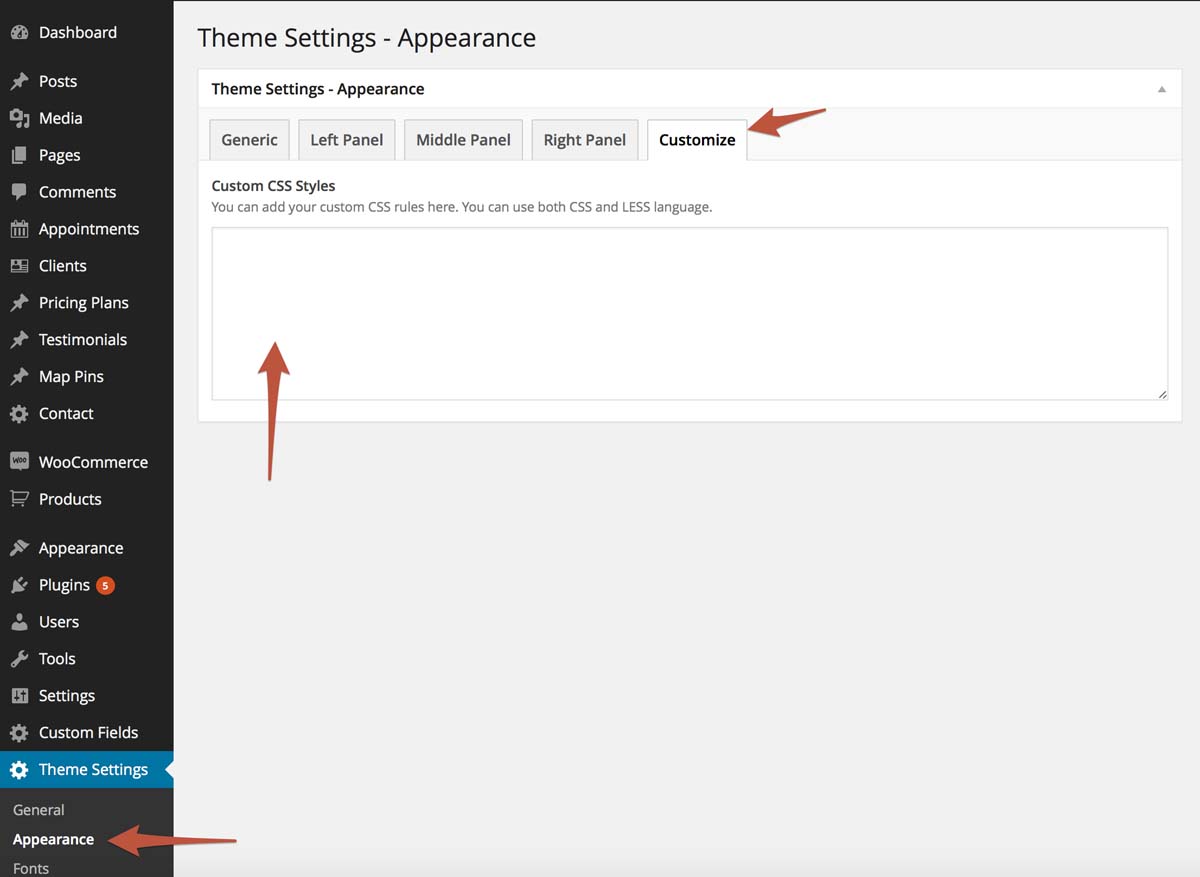
Second option is to type in your custom styles into the /extend/custom-styles.less file. Make sure to backup this file contents before a theme update, and put it back after you udpated the theme to preserve the modifications you've added.
Frequently Asked Questions
When I am trying to install this theme, a message appears "The package could not be installed. The theme is Missing the style.css Stylesheet.
After you've purchased theme Moon from ThemeForest, you will receive a package in a zip file. You are not suppose to upload the whole package. This package contains not only the theme itself but also documentation, child theme and licensing info. First of all, you should unzip it using winrar or winzip, and you will see the real theme zip folder that is inside, called moon.zip. This is the theme zip file you have need to install and activate instead.
How do I customize css styles for this theme?
You can add your custom CSS to the CSS Styles field in Admin > Theme Settings > Appearance > Customize tab > enter your LESS or CSS code into the textarea.
I see that you are using a LESS instead of a regular CSS, what is that?
This is basically the same as CSS just with some extra features like support for variables and mixins. You can use regular CSS in .less files and it work just fine. However if you want to take advantage of all the cool features of LESS, you can read more about it here: http://lesscss.org/
Images do not appear on full hegiht posts or some other pages or I am seeing a "Division by zero" error.
Try disabling "Jetpack" plugin if you have it installed, it messes up an output sometimes and prevents image sizes to be calculated.
I have installed and activated the theme but when I visit my website it shows a blank screen OR an error Fatal error: Class 'lessc' not found less-variables.php".
Make sure you are running at least PHP version 5.4 on your server.
Changelog & Updates History
Following you'll find a list of all theme Moon releases with a log of features added and bug fixes next to each one.
Version 1.0.0 (April 25th, 2015)
Initial Theme Release